Check out the previous post here
Introduction
In the last post, we implemented a lot of the core functionality of our game, there is still some stuff left but I think it’s about time we focused on improving the visual aspects of our game.
For any game, the visuals are as important as the mechanics themselves and most successful games have had a lot of care and effort put into their aesthetics. Let’s spend some time on the aesthetics of our game by replacing all the boring circles and rectangles with nice-looking sprites.
In this post, we will kickstart the visual overhaul by revamping the appearance of our player. We will learn about sprites and animations and then apply them to our player using Bevy. Before we do that, however, let’s spend some time cleaning up our code by exploring a Bevy concept we’ve already been using: “Plugins”.
Creating Plugins
Currently, our entire game is just one main.rs file. If you have developed software in the past, you are probably used to breaking up your code into modules spread across multiple files and folders. Each module usually focuses on a separate domain of the system. Our main.rs file isn’t massive but it will prove useful in the future to start breaking up our code base now. Luckily for us, this type of modularity is built into Bevy and we have already been using it to build out our game.
You might recall from the previous two posts how we added several plugins to our game, namely: DefaultPlugins, RapierPhysicsPlugin, and RapierDebugRenderPlugin. Plugins are used to modularize Bevy code, they can be used to bring in functionality from external libraries but they are also the recommended way of structuring your games internally.
Bevy encourages us to think of the different facets of our game as independent modules each focusing on their subset of functionality. These modules are structured as plugins for our main “app” to use. This lack of distinction between external and internal plugins is really useful because you may find that a particular internal plugin would be useful for other games as well and you can then choose to expose that plugin as a library for others with minimal code changes.
As we build out our game’s visuals you will notice that some of the plugins we develop aren’t necessarily tied to our game and could very easily be exposed as libraries and used in other games with some added polish. As you build more games with Bevy you might also find yourself building out a catalog of decoupled plugins that you reuse between your games.
Let us start by breaking off all the platform-related functionality into a separate plugin. First, create a separate Rust module to hold the code for this new plugin.
Note: Some people would choose to create a library crate to contain all the modules, however, I will keep everything in the binary crate for simplicity.
Add the following to the top of your main.rs:
mod platforms;Then create a src/platforms.rs file with the following plugin skeleton:
use bevy::prelude::*;

pub struct PlatformsPlugin;

impl Plugin for PlatformsPlugin {
    fn build(&self, app: &mut App) {
        app.add_startup_system(setup);
    }
}

fn setup() {
    println!("Hello from the platforms plugin!")
}
Bevy plugins are like containers around functionality. They allow us to attach systems, resources and even other plugins to our game. To create a plugin, we need to implement the Plugin trait for our plugin struct and implement the build method to add functionality to our app. In the above snippet, we add another startup system to our game. The value of plugins is that they allow us to separate the code for different domains, they are essentially an organizational tool for related functionality.
Let us add this newly created plugin to our game by changing main.rs like so:
// ...

use platforms::PlatformsPlugin;

// ...

fn main() {
    App::new()
        .insert_resource(ClearColor(COLOR_BACKGROUND))
        .add_plugins(DefaultPlugins.set(WindowPlugin {
            primary_window: Some(Window {
                title: "Bevy Platformer".to_string(),
                resolution: WindowResolution::new(WINDOW_WIDTH, WINDOW_HEIGHT),
                resizable: true,
                ..Default::default()
            }),
            ..Default::default()
        }))
        .add_plugin(RapierPhysicsPlugin::<NoUserData>::pixels_per_meter(200.0))
        .add_plugin(RapierDebugRenderPlugin::default())
        .add_plugin(PlatformsPlugin) // new plugin added
        .add_startup_system(setup)
        .add_system(movement)
        .add_system(jump)
        .add_system(rise)
        .add_system(fall)
        .run();
}
Now if you run the game you will see “Hello from the platforms plugin!” show up in your console. What has happened here is that by adding our newly created plugin to the game, all of its attached pieces have been injected into our game, which included a startup system with the println!() we just saw.
Next, let’s move all the PlatformBundle code from main.rs and put it next to our new plugin in platforms.rs:
Note: Since we’ll be moving code around I recommend checking out the GitHub link at the end of this post if you get lost.
use bevy::prelude::*;
use bevy_rapier2d::prelude::*;

use crate::WINDOW_BOTTOM_Y;

const COLOR_PLATFORM: Color = Color::rgb(0.29, 0.31, 0.41);

#[derive(Bundle)]
struct PlatformBundle {
    sprite_bundle: SpriteBundle,
    body: RigidBody,
    collider: Collider,
}

impl PlatformBundle {
    fn new(x: f32, scale: Vec3) -> Self {
        Self {
            sprite_bundle: SpriteBundle {
                sprite: Sprite {
                    color: COLOR_PLATFORM,
                    ..Default::default()
                },
                transform: Transform {
                    translation: Vec3::new(x, WINDOW_BOTTOM_Y + (scale.y / 2.0), 0.0),
                    scale,
                    ..Default::default()
                },
                ..Default::default()
            },
            body: RigidBody::Fixed,
            collider: Collider::cuboid(0.5, 0.5),
        }
    }
}

pub struct PlatformsPlugin;

impl Plugin for PlatformsPlugin {
    fn build(&self, app: &mut App) {
        app.add_startup_system(setup);
    }
}

fn setup(mut commands: Commands) {
    commands.spawn(PlatformBundle::new(-100.0, Vec3::new(75.0, 200.0, 1.0)));
    commands.spawn(PlatformBundle::new(100.0, Vec3::new(50.0, 350.0, 1.0)));
    commands.spawn(PlatformBundle::new(350.0, Vec3::new(150.0, 250.0, 1.0)));
}
There is nothing new going on here, this is just the code we wrote over the previous two posts. All we have done here is move all the code related to platforms into a separate file and expose the relevant parts through the plugin for our game to use. The “relevant parts” in this case is just a startup system that spawns three platforms but we will add more things as we build out our game further. The good news is that now we have a dedicated place to put future platform-related code.
Note, how we also moved the constant for the platform’s color to this module since it is platform specific however we chose to import the WINDOW_BOTTOM_Y constant since that is a shared constant and not platform specific. We also need to export this constant in main.rs like so:
// ...
pub const WINDOW_BOTTOM_Y: f32 = WINDOW_HEIGHT / -2.0;
// ...
That’s it! we have successfully created a “platform plugin” to house all the platform-related functionality of our game. We will be making extensive use of this plugin as we further develop our game. Our main.rs is now also slightly cleaner since all the platform code has been removed.
We should also create a separate plugin for player-related functionality, however, I will leave this as an exercise for the reader. Be sure to check the GitHub repository if you get stuck (Don’t forget to add your plugin to the app!). At the end of this exercise, our main.rs should be much cleaner and only have code for the application setup, the camera, and the floor. We will move some of this to separate plugins in the future.
Now let’s move on to adding some graphics to our game
Sprites
Before we talk about sprites we need to decide what sort of art style our game should have. This is one of the most important decisions in the life-cycle of building a game and developers usually put a lot of thought and effort into this decision. There are quite a few art styles to choose from, so it’s important to do your research and choose what fits best. Since we are only building this game for learning purposes, it doesn’t really matter what art style we choose, so we’ll just go with vector-based graphics. Now let’s talk about sprites.
A sprite is a 2D graphical object that is used to represent visual elements in your game world. Basically, sprites are just images (usually very tiny) that we stitch together on-screen to visualize a game world. There are a lot of ways to model 2D graphics but sprites are one of the most common mechanisms. When you think of a “2D platformer” the image that comes to your mind is probably of a game that uses sprites. To understand them better let’s look at a few examples, here is a sprite of Mario from Super Mario World:
As you can see it is just an image. In this case, of a mustachioed plumber that holds legendary status in gaming history. The above sprite is an example of pixel art style. Let’s look at another example:
Once again, just an image of a character, in this case, an enemy character. But sprites aren’t just used to visualize characters, they are also used to represent other parts of the game world. For example, here is a sprite of a specific part of the ground from Super Mario World:

That may not seem very interesting on its own but just like these sprites, Super Mario World has a whole catalog of sprites for things like blocks, projectiles, pipes, bushes, dirt etc. If you stitch them all together you get:

Hopefully, this gives you an idea of how sprites can be used to craft a game world. However, everything we just discussed would only render a static game world. For a world to feel alive, there needs to be motion so let’s talk about sprite animations.
Animation
First, we need to understand that sprite animations are just a trick of the mind. If we capture a series of snapshots of an object at different stages of its movement and display them in rapid succession on-screen it will give the perception of motion. This principle forms the basis for sprite animations. To understand this further let’s continue using Super Mario World as an example and look at a couple of sprites that show Mario at different points of his walk.
If we cycle through these three individual images quickly, we get:

As you should be able to see, in order to create 2D animations, we will need to render a sprite and then cycle through other variations of that sprite quickly.
Spritesheets
Now that we understand sprites and animations let’s talk about how sprites are usually integrated with game engines. Instead of having separate images for individual sprites, multiple sprites are usually laid out in a single image in a grid arrangement. This type of file is called a spritesheet. Here is a spritesheet from Super Mario World:
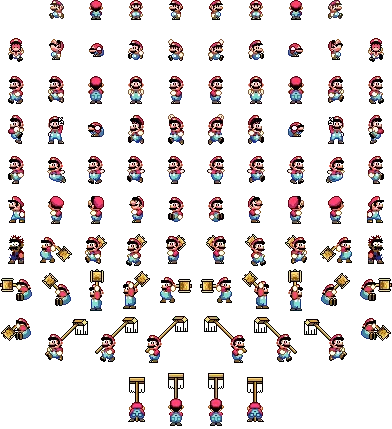
Spritesheets are employed to improve performance. If we had 100s of sprites and 100s of separate images for those sprites, there would be significant overhead for loading those files and switching between them. Instead, by having a single image, it is easier for the GPU to load that single image and switch between different locations in it to produce animations. There are additional performance gains if a spritesheet contains sprites for different elements, as the GPU can use a single file to populate multiple parts of the game world. This is a simplified understanding of the benefits of using sheets over individual images and I encourage you to explore this subject further.
Spritesheets are actually a specific form of something called a texture atlas. Whereas spritesheets refer specifically to an image file containing multiple 2D sprites, texture atlases are defined as files containing textures for graphical objects. So, you will also see spritesheets being referred to as texture atlases.
Now that we understand more about 2D graphics, let’s add them to our game.
Acquiring Assets
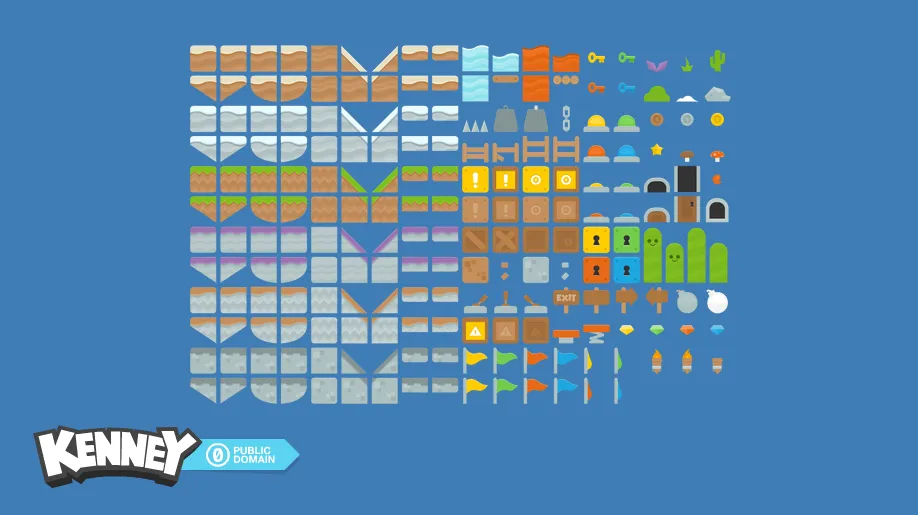
Designers spend a lot of time designing and creating assets for games and it is advisable to have a graphic designer create graphics tailor-made for your game. However, there are also a bunch of websites where some designers generously provide video game assets for free. One such site is https://kenney.nl where you can find a lot of well-crafted assets for free. For this tutorial, we are going to use the Platformer Redux Pack from KenneyNL, which is a set of vector graphics made specifically with platformers in mind. Visit the page, download (consider donating!) and unzip the asset pack.
Designers structure assets in different ways so it’s always best to spend some time exploring newly acquired asset packs. Open up the unzipped folder and let’s explore what we just downloaded. There are a bunch of files and folders here but the one we are most interested in is the Spritesheets folder.
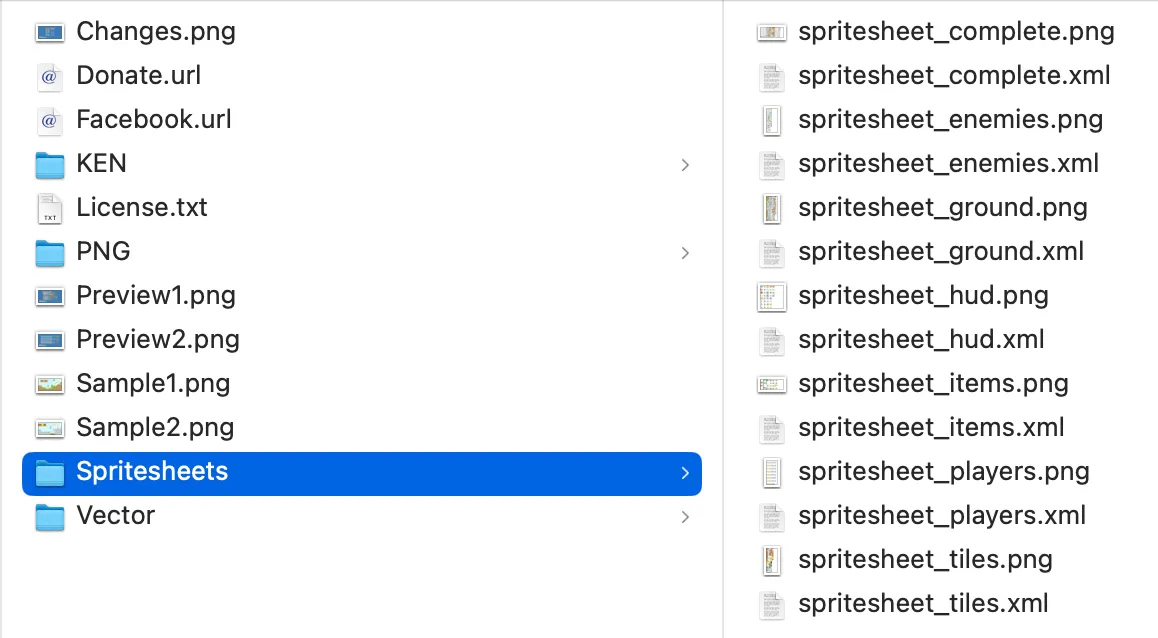
This folder contains multiple spritesheets for different visual elements along with XML files that describe those spritesheets, we will not be directly using these XML files but they will help us gain more information about their corresponding spritesheets.
This folder also contains a spritesheet that has all the sprites from this pack (Spritesheets/spritesheet_complete.png). Loading this single spritesheet would be the most optimal way of using the pack, however, to keep explanations simple, I will be using separate spritesheets for different elements.
Rendering the Player
We are going to start our visual overhaul process by rendering a sprite for the player’s character, so open up the spritesheet intended for playable characters, Spritesheets/spritesheet_players.png.
![]()
This spritesheet is laid out in a similar way to the one we saw earlier from Super Mario World. Most spritesheets you encounter will be laid out in this grid arrangement. The spritesheet has sprites for all the different poses for the different characters in this pack. We only need one character so go ahead and pick a color you like, I will choose the beige alien.
Before we load this spritesheet into our game, we need to gather some information that Bevy needs to effectively render sprites from it. First, we need the number of rows and columns in this spritesheet. As was previously mentioned, a spritesheet is laid out as a grid of sprites and a game engine needs to know the number of rows and columns in this grid to render sprites from it.
Looking at the above image, we can see it has 7 columns of sprites across 8 rows (some rows have fewer than 7 sprites but we take the maximum). Let’s store this information as constants for future use. Add the following next to our player plugin in player.rs:
const SPRITESHEET_COLS: usize = 7;
const SPRITESHEET_ROWS: usize = 8;
Next, we need the size of each sprite in the sheet. Each sprite in a spritesheet is contained within uniformly sized rectangles, otherwise, switching between them would be more involved. The sprites may appear to be of different sizes visually but they are all contained in tiles of the same size. The difference between the visuals of a sprite and the size of its tile means that each sprite has a little bit of transparent space associated with it.
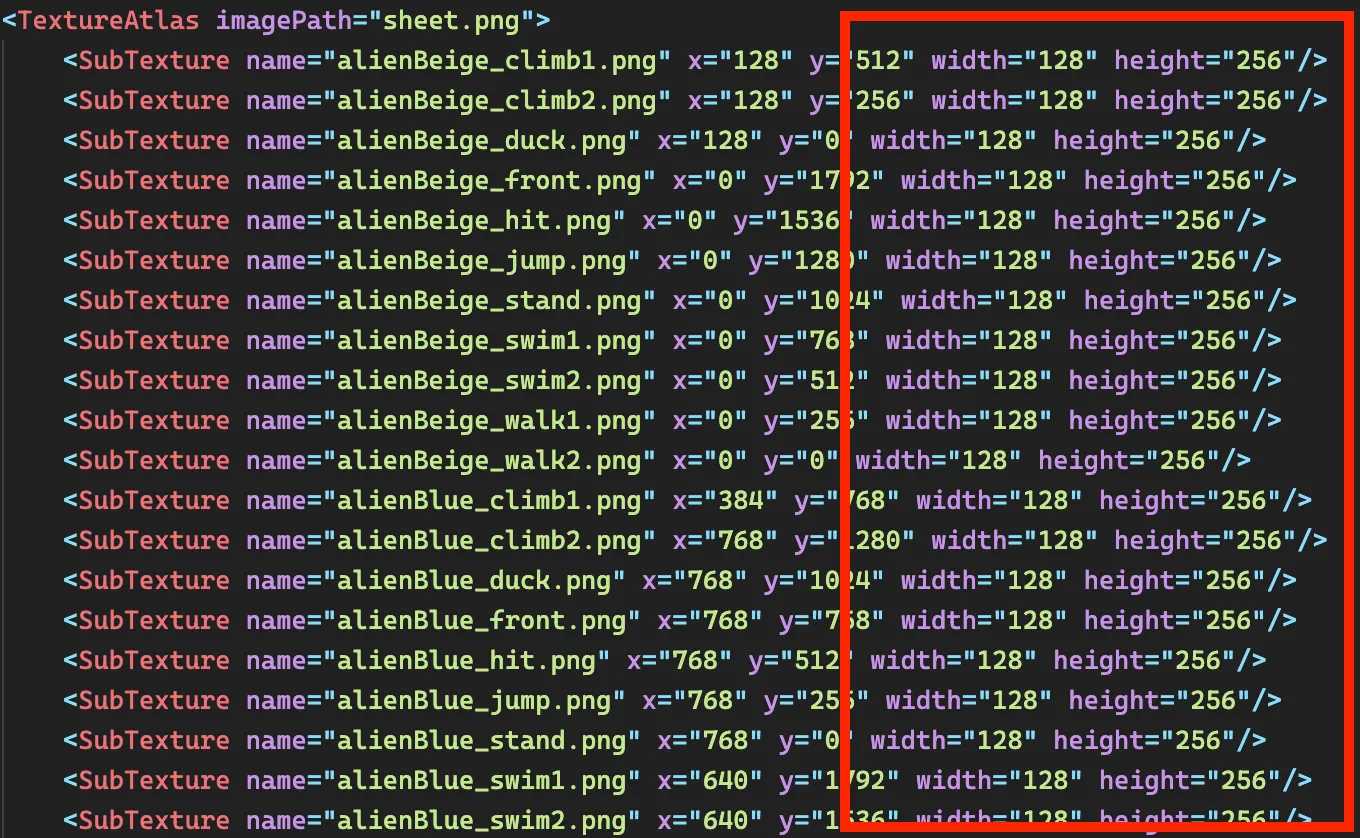
If you open up Spritesheets/spritesheet_players.xml, you will see the width and height of each tile is the same:
Let’s add constants for this too:
const SPRITE_TILE_WIDTH: f32 = 128.0;
const SPRITE_TILE_HEIGHT: f32 = 256.0;
Next, we need the index of the sprite we want to render. First, let’s decide which sprite we want to use when the character is standing still. If we again look at Spritesheets/spritesheet_players.xml (shown above) we see that each sprite also has an associated name, which gives us a hint as to what that sprite suppose to represent. Luckily there is a sprite called alienBeige_stand which is located at x=0 and y=1024 (x goes from left to right, y goes from top to bottom in this spritesheet):
Now, we need the “index” of this sprite. Indices in a spritesheet start from 0 and increase left to right then top to bottom. I’ve labelled some indices on the spritesheet below:
![]()
The index for our “standing” sprite is 28, let’s add a constant for this too:
const SPRITE_IDX_STAND: usize = 28;Now, with all this information we can finally render our player. First, copy Spritesheets/spritesheet_players.png from the pack to assets/spritesheets/spritesheet_players.png inside our project. Next, Change the setup() system of the player plugin like so:
fn setup(
    mut commands: Commands,
    mut atlases: ResMut<Assets<TextureAtlas>>,
    server: Res<AssetServer>,
) {
    let image_handle: Handle<Image> = server.load("spritesheets/spritesheet_players.png");
    let texture_atlas = TextureAtlas::from_grid(
        image_handle,
        Vec2::new(SPRITE_TILE_WIDTH, SPRITE_TILE_HEIGHT),
        SPRITESHEET_COLS,
        SPRITESHEET_ROWS,
        None,
        None,
    );
    let atlas_handle = atlases.add(texture_atlas);

    commands
        .spawn(SpriteSheetBundle {
            sprite: TextureAtlasSprite::new(SPRITE_IDX_STAND),
            texture_atlas: atlas_handle,
            transform: Transform {
                translation: Vec3::new(WINDOW_LEFT_X + 100.0, WINDOW_BOTTOM_Y + 300.0, 0.0),
                ..Default::default()
            },
            ..Default::default()
        })
        .insert(RigidBody::KinematicPositionBased)
        .insert(Collider::ball(0.5))
        .insert(KinematicCharacterController::default());
}
Our setup() system has changed slightly so let’s talk about it. First, notice that the arguments to the setup() system are now different, we have removed references to meshes and materials since we are no longer rendering a colored ball and replaced them with 2 other resources: the asset server resource (server) and the resource for the asset storage of texture atlases (atlases).
To understand what is going on further, we need to understand how Bevy handles asset loading. You might think that to load the spritesheet into the game we could have used something like std::fs::read(), however, this would not be the most optimal choice. Assets can include things like 3D models and soundtracks which can be large files depending on the game, this coupled with the fact that I/O operations are generally slow means we might end up blocking our game while the assets finish loading. This isn’t the best user experience, which is why Bevy loads assets asynchronously in the background.
The asset server is the primary way of loading external assets into Bevy. The asset server is accessed as a resource, like the ones we discussed in the previous post, and can be configured to do a lot of powerful things. By default, it reads assets from the assets folder (which is where we copied our spritesheet), loads them asynchronously in the background, keeps track of their state, and also tracks changes to them.
Once an asset has finished loading it ends up inside its specific kind of asset storage. Asset storages are represented by the Assets<T> type where T is the type of the asset.
The Bevy asset server provides built-in support for loading various types of assets such as audio files, fonts, images, and GLTF files. However, loading spritesheets requires additional configuration information that is not directly encoded into the spritesheet image file. As a result, Bevy does not support loading spritesheets directly.
Instead, we need to manually create a spritesheet object (a texture atlas) by combining the raw image with the necessary configuration information. Once created, we can store it inside the asset storage of texture atlases.
The asset server returns a handle to the asset we request. Handles are like pointers or references to the actual asset. They most closely resemble Rust’s Rc or Arc types, in that they are a reference counting pointer with support for weak and strong references. Since assets can be very large, it is not optimal to copy them around, which is why throughout the Bevy API (and most plugins) you will see that wherever an asset is required, a handle to that asset is accepted, as it is much cheaper to copy around handles and because handles can exist even if the asset has not yet been loaded.
Now let’s discuss the following lines of code:
fn setup(
    mut commands: Commands,
    mut atlases: ResMut<Assets<TextureAtlas>>,
    server: Res<AssetServer>,
) {
    let image_handle: Handle<Image> = server.load("spritesheets/spritesheet_players.png");
    let texture_atlas = TextureAtlas::from_grid(
        image_handle,
        Vec2::new(SPRITE_TILE_WIDTH, SPRITE_TILE_HEIGHT),
        SPRITESHEET_COLS,
        SPRITESHEET_ROWS,
        None,
        None,
    );
    let atlas_handle = atlases.add(texture_atlas);

    // ...
}
Here, we tell the asset server to load the spritesheet image file (the asset server knows how to load images by default) and give us an image handle. Using the image handle we then construct a TextureAtlas (the spritesheet object) using its from_grid() builder function. Here, along with the image handle, we pass a vector describing the size of each tile in the spritesheet using the constants we declared earlier. We also pass in the number of columns and rows in the spritesheet, once again, using the constants we defined earlier. The last two arguments are for padding and offsets, for which we specify None.
Once we have the texture atlas we add it to its asset storage, by calling atlases.add(), so that Bevy can track it and provide us a handle to it.
Now with the work of loading a spritesheet out of the way, we can move on to attaching components to our player entity that will result in a sprite showing up on-screen:
fn setup(
    mut commands: Commands,
    mut atlases: ResMut<Assets<TextureAtlas>>,
    server: Res<AssetServer>,
) {
    // ...
    let atlas_handle = atlases.add(texture_atlas);

    commands
        .spawn(SpriteSheetBundle {
            sprite: TextureAtlasSprite::new(SPRITE_IDX_STAND),
            texture_atlas: atlas_handle,
            transform: Transform {
                translation: Vec3::new(WINDOW_LEFT_X + 100.0, WINDOW_BOTTOM_Y + 300.0, 0.0),
                ..Default::default()
            },
            ..Default::default()
        })
        .insert(RigidBody::KinematicPositionBased)
        .insert(Collider::ball(0.5))
        .insert(KinematicCharacterController::default());
}
To render the sprite, we replace the MaterialMesh2dBundle we had previously with the SpriteSheetBundle. We provide the texture atlas handle we got from the asset storage, a TextureAtlasSprite with the index of the sprite we want to render and a transform for where the sprite should be. Notice, that I have removed the explicit scale component we set earlier and that I have moved the starting y-coordinate a bit higher. You can also go ahead and remove any unused imports and constants from our ball implementation.
If you run the game now, you will see something strange:
The sprite renders! but then falls through the floor until just the top part of the head is above ground. We can move the character around and it does seem to be colliding with the platforms but in some strange way. Take a minute to think about why this could be happening.
This strange behavior is being caused by the fact that we haven’t updated the collider yet. The collider still thinks the player is a 1x1 pixel ball and since we removed the scale component, the collider is now a tiny dot at the center of the sprite. It may seem like the collider isn’t at the center of the sprite since it appears to be inside the head of the alien and not the body but this is because of the extra space that our sprites have. The following diagram depicts this.
![]()
Let’s fix the collider now. We could make the collider precisely match the visuals of our sprite, however, as I mentioned in the previous post, this tends to come with performance implications. Even though those implications aren’t very pertinent to our small game, we will go with a rectangular collider because a precise collider does not add much value to our game. Our gameplay will not be affected by approximating our character to a rectangle. We may change the size of this rectangle for more precise gameplay but a rectangle should suffice.
Let’s change the collider now in player.rs:
commands
    .spawn(SpriteSheetBundle {
        sprite: TextureAtlasSprite::new(SPRITE_IDX_STAND),
        texture_atlas: atlas_handle,
        transform: Transform {
            translation: Vec3::new(WINDOW_LEFT_X + 100.0, WINDOW_BOTTOM_Y + 300.0, 0.0),
            ..Default::default()
        },
        ..Default::default()
    })
    .insert(RigidBody::KinematicPositionBased)
    .insert(Collider::cuboid(    // collider updated
        SPRITE_TILE_WIDTH / 2.0,
        SPRITE_TILE_HEIGHT / 2.0,
    ))
    .insert(KinematicCharacterController::default());
Here, we change to a cuboid collider and specify the half-extents using our constants (check the previous post if you are unsure what half-extents are). Run the game now and you will see the collisions working properly.
Great work! You can also see that the collider visualization around the player, from the RapierDebugRenderPlugin, also encompasses the extra space.
Understanding how sprites work, how they are loaded into Bevy, and successfully rendering a sprite with proper collision detection is great progress!
We’re not done yet though. You might have noticed that the sprite kind of looks too big compared to the rest of our game world. There are a couple of ways we can fix this, we could just scale up everything else in the game to be comparable in size to the character and zoom out the camera. However, we are going to use something we’ve already used in the past: the Scale component.
If you recall, the Scale component can be used to change the original size of entities, and colliders also respect the Scale component by adjusting their size accordingly. So, we’ll go ahead and add a Scale component to our player. First, let us define constants for the desired on-screen size of the character:
const SPRITE_RENDER_WIDTH: f32 = 64.0;
const SPRITE_RENDER_HEIGHT: f32 = 128.0;
I’ve decided to render the sprite at half the original size. Now add the scaling component:
commands
    .spawn(SpriteSheetBundle {
        sprite: TextureAtlasSprite::new(SPRITE_IDX_STAND),
        texture_atlas: atlas_handle,
        transform: Transform {
            translation: Vec3::new(WINDOW_LEFT_X + 100.0, WINDOW_BOTTOM_Y + 300.0, 0.0),
            scale: Vec3::new( // scale added
                SPRITE_RENDER_WIDTH / SPRITE_TILE_WIDTH,
                SPRITE_RENDER_HEIGHT / SPRITE_TILE_HEIGHT,
                1.0,
            ),
            ..Default::default()
        },
        ..Default::default()
    })
    .insert(RigidBody::KinematicPositionBased)
    .insert(Collider::cuboid(
        SPRITE_TILE_WIDTH / 2.0,
        SPRITE_TILE_HEIGHT / 2.0,
    ))
    .insert(KinematicCharacterController::default());
We added the Scale component by calculating the ratio between the desired size and the actual size of the sprite. If you run the game now, things will look much better.
![]()
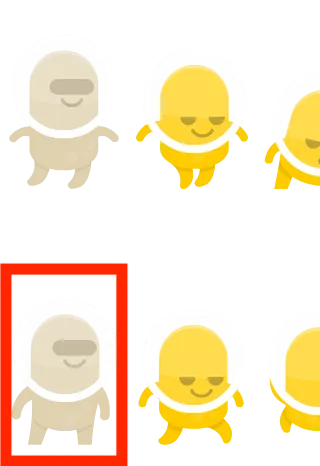
Even though our sprite can move around the game, it doesn’t actually look like it’s moving. Time to add some sprite animations. If you recall, sprite animations are achieved by quickly cycling through a set of sprites. First, let’s decide which sprites we want to use for the movement animation. The Spritesheets/spritesheet_players.xml file inside the pack will help us here again. If you open up the file you will see two sprites labeled alienBeige_walk1 and alienBeige_walk2 respectively.
![]()
We will be using these for our walking animation. Their indices are 7 and 0 respectively (index = <row> * TOTAL_COLUMNS + <col> with rows and columns starting from 0). Create a constant slice to hold these indices:
const SPRITE_IDX_WALKING: &[usize] = &[7, 0];Before we create a system that cycles through these indices, we need to decide how long to show each sprite as we cycle through them. The animation would be too quick to notice without this delay. 70ms is a good starting choice for this. Add a constant for this as well:
const CYCLE_DELAY: Duration = Duration::from_millis(70);Now, we could hardcode the animation functionality just for our player character (since we only forsee the player character being animated in our game). However, it would be better to create a generic implementation of this functionality for possible reuse, in this game or others. We’ll create a separate animation plugin for this in case we want to export this for other games in the future.
Now let’s plan out this functionality. Thinking in terms of ECS we want an animation component that can be attached to any entity that has a sprite (TextureAtlasSprite) in order to animate it. This component will store two pieces of information:
- A set of sprites to cycle through
- The duration that each sprite should be shown
Anyone using our plugin should be able to attach this component to their entities to animate them.
Let’s create this custom component inside animation.rs (remember to add mod animation to main.rs):
use std::time::Duration;

use bevy::prelude::*;

#[derive(Component)]
pub struct Animation {
    pub sprites: &'static [usize],
    pub timer: Timer,
}

impl Animation {
    pub fn new(sprites: &'static [usize], delay: Duration) -> Self {
        Self {
            sprites,
            timer: Timer::new(delay, TimerMode::Repeating),
        }
    }
}
Here we create a struct that wraps the required values and derive Component to turn it into a Bevy component.
We use a Timer to store the delay. Timer is a utility type that Bevy provides to track durations of time. It works kind of like the “timer” or “stopwatch” app in your phone. The difference is that we have to manually tick the Timer forward in time. It provides us useful functions that let us know if the configured time has elapsed. We use a repeating timer since we’ll be continuously checking if the delay time has passed between sprite changes. We also added a new() function to easily create instances of this component.
Next, we need to create a system that queries for all entities that have a TextureAtlasSprite and our Animation component, then we’ll check if the cycle delay time has passed using the timer, if it has, we will change the sprite that is being rendered. We will also create an AnimationPlugin to expose this system:
pub struct AnimationPlugin;

impl Plugin for AnimationPlugin {
    fn build(&self, app: &mut App) {
        app.add_system(animate);
    }
}

fn animate(mut query: Query<(&mut TextureAtlasSprite, &mut Animation)>, time: Res<Time>) {
    for (mut sprite, mut animation) in query.iter_mut() {
        if animation.timer.tick(time.delta()).just_finished() {
            let current_idx = animation
                .sprites
                .iter()
                .position(|s| *s == sprite.index)
                .unwrap_or(0); // default to 0 if the current sprite is not in the set

            let next_idx = (current_idx + animation.timer.times_finished_this_tick() as usize)
                % animation.sprites.len();

            sprite.index = animation.sprites[next_idx];
        }
    }
}
We created a plugin that adds a single system to the app. The system queries for all entities with TextureAtlasSprite and Animation components, it also requests the Time resource which we will use to tick the Timers forward in time. Here we do something we haven’t done previously with our queries: we loop over all the matches. Before this, our systems only affected a single entity (the player character) which is why we used the .single() and .single_mut() methods on the query. We only expected a single match so we extracted one entity from the query. However, now, we are building a generic animation system that could apply to several entities so we use the iter_mut() method to loop over all query matches (use .iter() to loop immutably). This is the recommended way of interacting with query results, even if you expect a single match.
For each match, we tick the Timer inside its Animation component forward using the time elapsed since the last frame. Then we use the just_finished() method on the Timer to check if the delay time has elapsed. If it has, we start by first getting the index of the currently rendered sprite inside our sprite set in the Animation component so that we can transition to a subsequent sprite in the set.
The next bit of code selects the next sprite to be rendered and it has another example of not tying our game to the framerate:
let next_idx = (current_idx + animation.timer.times_finished_this_tick() as usize)
    % animation.sprites.len();
Instead of simply selecting the next sprite (i.e incrementing the current index by 1), we increment it by the number of times the timer finished within the current frame. A repeating timer restarts after the configured time has elapsed, so, it’s possible for the timer to finish multiple times within a single frame, depending on the amount of time that has passed.
Let’s explore this by considering the alternative where we indeed increment the index by 1 without considering the excess time beyond the configured cycle delay. In this scenario, regardless of whether 70ms or 7000ms have passed, we would always render the next immediate sprite. This means our animation would be tied to the framerate. Players experiencing different framerates would experience the animation differently. It would also result in choppy animations on slower computers. The following diagram illustrates this, assuming a cycle delay of 100ms:

As you can see, even though the same amount of time has passed for both players (500ms) they see different sprites due to the difference in their framerates.
We can fix this if we calculate which sprite should be rendered based on how much time has passed. This is exactly what we do in the above snippet using times_finished_this_tick(), which gives us the number of times the timer completed in the current frame. The following diagram depicts this scenario:
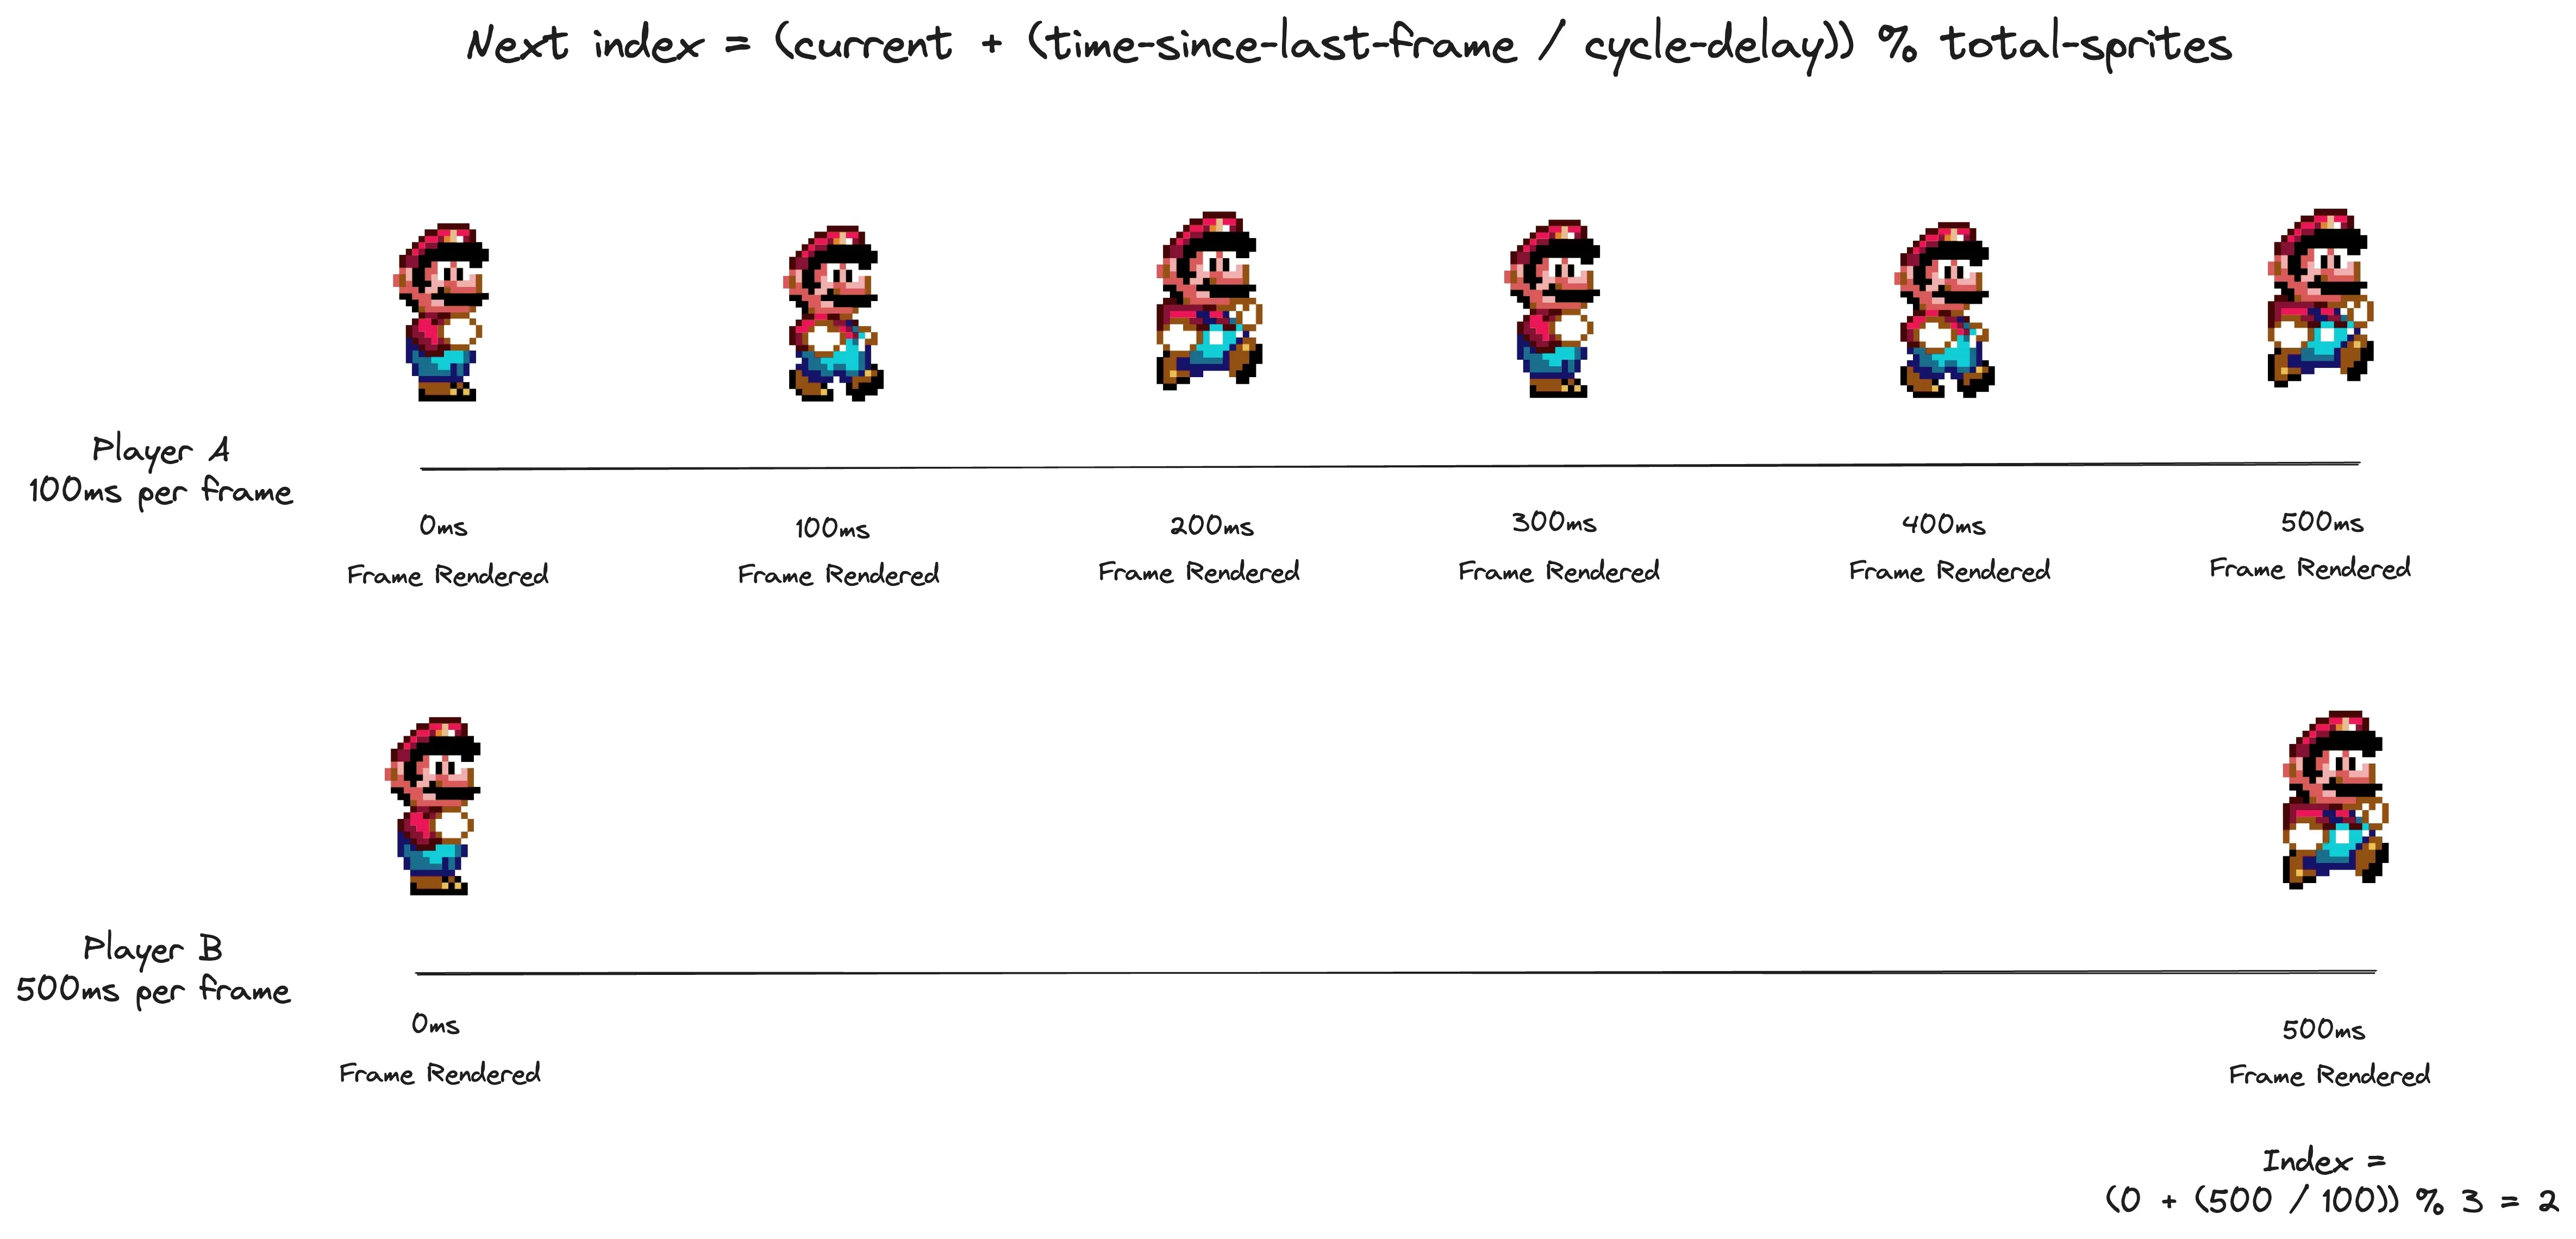
As you can see, both players see the same sprite regardless of the difference in their framerate because the animation is now tied to the actual passage of time. Note that we also clamp the value using the length of the sprite set so we can keep looping over the sprites.
When developing game logic, it’s important to be vigilant and avoid scenarios where your game becomes dependent on the frame rate.
Coming back to the code, after we calculate the next index, we update the TextureAtlasSprite with the new index. Add this plugin to main.rs like we did for the other plugins and then we can use the Animation component to animate the player character.
We need to create a system that applies the Animation component if the player is moving:
impl Plugin for PlayerPlugin {
    fn build(&self, app: &mut App) {
        app.add_startup_system(setup)
            .add_system(movement)
            .add_system(jump)
            .add_system(rise)
            .add_system(fall)
            .add_system(apply_movement_animation); // new system added
    }
}

// ...

fn apply_movement_animation(
    mut commands: Commands,
    query: Query<(Entity, &KinematicCharacterControllerOutput), Without<Animation>>,
) {
    if query.is_empty() {
        return;
    }

    let (player, output) = query.single();
    if output.desired_translation.x != 0.0 && output.grounded {
        commands
            .entity(player)
            .insert(Animation::new(SPRITE_IDX_WALKING, CYCLE_DELAY));
    }
}
Here, we check if the player has a non-zero X translation, if they do we add our Animation component to the entity with the constants we defined earlier. We also ensure the player is grounded since we don’t want to apply the movement animation if the player is jumping. Note that in the query we check that the player does not already have an Animation component using Without<Animation>, this so that we don’t keep adding the animation in a loop (and thus resetting it every frame).
If you run the game now, you should see the animation being applied when you move the player!
There are a few problems here. First, the direction of the movement doesn’t seem to affect the animation, we’ll fix this in a while. The other problem is that the animation never ends, even if you stop moving. Let’s create a system to remove the animation once the player stops moving.
impl Plugin for PlayerPlugin {
    fn build(&self, app: &mut App) {
        app.add_startup_system(setup)
            .add_system(movement)
            .add_system(jump)
            .add_system(rise)
            .add_system(fall)
            .add_system(apply_movement_animation)
            .add_system(apply_idle_sprite); // new system added
    }
}


fn apply_idle_sprite(
    mut commands: Commands,
    mut query: Query<(
        Entity,
        &KinematicCharacterControllerOutput,
        &mut TextureAtlasSprite,
    )>,
) {
    if query.is_empty() {
        return;
    }

    let (player, output, mut sprite) = query.single_mut();
    if output.desired_translation.x == 0.0 && output.grounded {
        commands.entity(player).remove::<Animation>();
        sprite.index = SPRITE_IDX_STAND
    }
}
This one is pretty straightforward. We query for the player and remove the Animation component if their x translation is 0 and they are grounded, we also set the sprite index to the idle sprite. Run the game and you’ll see the animation stops when the character stops moving.
Let’s keep going and add a different sprite for when the character is jumping. Using the same technique as before we can see that the index of the jumping sprite is 35. Let’s add a constant for this, followed by a system that applies the sprite:
const SPRITE_IDX_JUMP: usize = 35;
// ...

impl Plugin for PlayerPlugin {
    fn build(&self, app: &mut App) {
        app.add_startup_system(setup)
            .add_system(movement)
            .add_system(jump)
            .add_system(rise)
            .add_system(fall)
            .add_system(apply_movement_animation)
            .add_system(apply_idle_sprite)
            .add_system(apply_jump_sprite); // new system added
    }
}

// ...

fn apply_jump_sprite(
    mut commands: Commands,
    mut query: Query<(
        Entity,
        &KinematicCharacterControllerOutput,
        &mut TextureAtlasSprite,
    )>,
) {
    if query.is_empty() {
        return;
    }

    let (player, output, mut sprite) = query.single_mut();
    if !output.grounded {
        commands.entity(player).remove::<Animation>();
        sprite.index = SPRITE_IDX_JUMP
    }
}
This one is also self-explanatory. Simply apply the jumping sprite index if the character is not grounded. We also remove any Animation components if they exist because we want the jump visual to take precedence.
Run the game now and make sure everything works correctly.
Now let’s fix the one problem we have left: the sprite does not match the direction of the movement. We are going to solve this by keeping track of the last direction the user moved towards. To do this we will need to maintain some state. So, let’s create a new component and add a new system to update it:
impl Plugin for PlayerPlugin {
    fn build(&self, app: &mut App) {
        app.add_startup_system(setup)
            .add_system(movement)
            .add_system(jump)
            .add_system(rise)
            .add_system(fall)
            .add_system(apply_movement_animation)
            .add_system(apply_idle_sprite)
            .add_system(apply_jump_sprite)
            .add_system(update_direction); // new system added
    }
}

#[derive(Component)]
enum Direction {
    Right,
    Left,
}

fn setup(
    mut commands: Commands,
    mut atlases: ResMut<Assets<TextureAtlas>>,
    server: Res<AssetServer>,
) {

    // ...
    commands
        .spawn(SpriteSheetBundle {
            sprite: TextureAtlasSprite::new(SPRITE_IDX_STAND),
            texture_atlas: atlas_handle,
            transform: Transform {
                translation: Vec3::new(WINDOW_LEFT_X + 100.0, WINDOW_BOTTOM_Y + 300.0, 0.0),
                scale: Vec3::new(
                    SPRITE_RENDER_WIDTH / SPRITE_TILE_WIDTH,
                    SPRITE_RENDER_HEIGHT / SPRITE_TILE_HEIGHT,
                    1.0,
                ),
                ..Default::default()
            },
            ..Default::default()
        })
        .insert(RigidBody::KinematicPositionBased)
        .insert(Collider::cuboid(
            SPRITE_TILE_WIDTH / 2.0,
            SPRITE_TILE_HEIGHT / 2.0,
        ))
        .insert(KinematicCharacterController::default())
        .insert(Direction::Right); // default direction
}


fn update_direction(
    mut commands: Commands,
    query: Query<(Entity, &KinematicCharacterControllerOutput)>,
) {
    if query.is_empty() {
        return;
    }

    let (player, output) = query.single();

    if output.desired_translation.x > 0.0 {
        commands.entity(player).insert(Direction::Right);
    } else if output.desired_translation.x < 0.0 {
        commands.entity(player).insert(Direction::Left);
    }
}
Here, we define a new Direction component. We spawn the player character with the direction set to Right by default. Then, we create a system that updates the direction based on which direction the player is moving in.
Now, we need to update the sprite based on this direction. However, you may have noticed that the spritesheet does not have any sprites facing left. Instead, the designer expects us to horizontally flip the existing sprites to represent the character facing left. This approach is common when using spritesheets and most spritesheets you come across will expect you to flip a given sprite to represent a different direction or orientation. This helps reduce file size by avoiding the need to include duplicate images which only vary in orientation.
The following system uses the flip_x property on the TextureAtlasSprite to achieve this:
impl Plugin for PlayerPlugin {
    fn build(&self, app: &mut App) {
        app.add_startup_system(setup)
            .add_system(movement)
            .add_system(jump)
            .add_system(rise)
            .add_system(fall)
            .add_system(apply_movement_animation)
            .add_system(apply_idle_sprite)
            .add_system(apply_jump_sprite)
            .add_system(update_direction)
            .add_system(update_sprite_direction); // new system added
    }
}

fn update_sprite_direction(mut query: Query<(&mut TextureAtlasSprite, &Direction)>) {
    if query.is_empty() {
        return;
    }

    let (mut sprite, direction) = query.single_mut();

    match direction {
        Direction::Right => sprite.flip_x = false,
        Direction::Left => sprite.flip_x = true,
    }
}
Run the game now and you should see the character animations working flawlessly.
Great work! Our character is now fully animated!
I went through the last few systems pretty quickly but that was on purpose since you should now be getting the hang of understanding queries and writing game logic.
In the interest of keeping each post digestible, I think this is a good place to stop. Take some time to absorb everything we’ve covered in this post since we’ll be reusing it in the future.
Next time we will continue our visual overhaul process by focusing on other parts of the game. See you then!
All the code for this part is available on Github.