Check out the previous post here
Introduction
Last time we left off we had finished rendering some basic shapes to the screen. In this post, we will breathe “life” into our shapes using the Rapier physics engine. By the end of this post, an actual game should start to materialize.
Most, if not all games, support some level of physics. Things like: gravity, collisions, projectile motion, and bouncing all fall under the umbrella of physics simulation. Physics simulation is a complicated subject that involves a lot of math while being difficult to get right, which is why it is, generally, not a good idea to implement physics from scratch for your game.
Rapier is a physics simulation engine for Rust. It exposes an easy-to-use API and also has a plugin for Bevy. We will not be making extensive use of the features that Rapier provides since our game is very simple but this post should give you an idea of how Rapier works and how to integrate it with your project.
Integrating Rapier
First, we will add Rapier as a dependency:
cargo add bevy_rapier2dThen enable two of its key plugins:
fn main() {
    App::new()
        .insert_resource(ClearColor(COLOR_BACKGROUND))
        .add_plugins(DefaultPlugins.set(WindowPlugin {
            primary_window: Some(Window {
                title: "Bevy Platformer".to_string(),
                resolution: WindowResolution::new(WINDOW_WIDTH, WINDOW_HEIGHT),
                resizable: true,
                ..Default::default()
            }),
            ..Default::default()
        }))
        .add_plugin(RapierPhysicsPlugin::<NoUserData>::pixels_per_meter(200.0)) // Physics plugin
        .add_plugin(RapierDebugRenderPlugin::default()) // Debug plugin
        .add_startup_system(setup)
        .run();
}
Here we are making use of two plugins that Rapier provides:
RapierPhysicsPlugin is the plugin that adds physics to your game. Rapier allows you to customize how it works using hooks by providing a type that implements BevyPhysicsHooks. Since we don’t want to apply any customizations we provide the NoUserData type (which is just an alias for ()). We initialize an instance of this plugin using pixels_per_meter().
Internally, Rapier uses SI Units (meters, kilograms, seconds, etc) to perform its calculations. We use the pixels_per_meter() builder function to give Rapier a way to map pixels into meters for calculations, after this we will continue to use pixel units in our code and Rapier will convert those to meters using the value we supplied.
RapierDebugRenderPlugin is a plugin only meant to be used for debugging purposes, it enables visualizations for some Rapier components (which we will see later).
Rigid Bodies and Colliders
The first thing we will do is add mass to our platforms by setting them up as rigid bodies. The simulation of rigid bodies is a key component in any physics engine. They are non-deformable solid bodies that interact with the physics world in some capacity. They do this by reacting to the forces and contacts that are applied to them and by exerting these on other rigid bodies. In Rapier there are three kinds of rigid bodies (docs):
- Dynamic: These bodies react to all external forces and contacts. An example would be obstacles that a player can move around.
- Fixed: These bodies collide with dynamic bodies but cannot move. They behave like they have infinite mass. Examples include walls, the ground, and platforms (hint).
- Kinematic: These bodies exist in the physics world but defy the laws of physics, for example, they can move without external forces being applied to them and can pass through other bodies. Examples include elevators and moving platforms. If you think about it, the player’s character also matches part of this definition. A player’s character has agency over its motion (in most games), it does not need an external force applied to it for it to move. Its motion only depends on the player’s inputs. Rapier has two kinds of kinematic bodies: velocity-based and translation-based.
Another related concept is that of colliders. Simply put, colliders define the shape and size of a body in the physics world. When bodies interact in the physics world, a lot of these interactions happen around collision points (i.e. when bodies come into contact with one another). Using colliders we can define the contact points of a body. Think of colliders as the “hit box” of your entity.
As hinted above, our platforms fall into the category of fixed rigid bodies. We want the player’s character to be able to interact with platforms (stand on them) but we do not want the platforms to react in any way (fall over). However, just to play around with Rapier, first, let us configure them as dynamic bodies to see what happens. Rapier exposes the RigidBody component to express that an entity is a rigid body and the Collider component to express that entity’s contact points. Let’s use these in our setup() system:
fn setup(
    mut commands: Commands,
    mut meshes: ResMut<Assets<Mesh>>,
    mut materials: ResMut<Assets<ColorMaterial>>,
) {
    commands
        .spawn(SpriteBundle {
            sprite: Sprite {
                color: COLOR_PLATFORM,
                ..Default::default()
            },
            transform: Transform {
                translation: Vec3::new(-100.0, 0.0, 0.0),
                scale: Vec3::new(75.0, 200.0, 1.0),
                ..Default::default()
            },
            ..Default::default()
        })
        .insert(RigidBody::Dynamic)
        .insert(Collider::cuboid(0.5, 0.5));

    commands
        .spawn(SpriteBundle {
            sprite: Sprite {
                color: COLOR_PLATFORM,
                ..Default::default()
            },
            transform: Transform {
                translation: Vec3::new(100.0, 0.0, 0.0),
                scale: Vec3::new(50.0, 350.0, 1.0),
                ..Default::default()
            },
            ..Default::default()
        })
        .insert(RigidBody::Dynamic)
        .insert(Collider::cuboid(0.5, 0.5));

    commands
        .spawn(SpriteBundle {
            sprite: Sprite {
                color: COLOR_PLATFORM,
                ..Default::default()
            },
            transform: Transform {
                translation: Vec3::new(350.0, 0.0, 0.0),
                scale: Vec3::new(150.0, 250.0, 1.0),
                ..Default::default()
            },
            ..Default::default()
        })
        .insert(RigidBody::Dynamic)
        .insert(Collider::cuboid(0.5, 0.5));

    // code for the ball and the camera remains the same
}
Notice how we have changed the Y-coordinate of each platform to 0.0, this is only temporary to see the effects of what we are doing.
We also used the insert() function to add more components to the entities created using spawn(). We added the RigidBody component to each platform with a variant of Dynamic (eventually we will use Fixed) along with the Collider component.
As I mentioned above we need to define the shape and size of our colliders, in an ideal world our colliders would automatically match the shapes of our rendered entities without us needing to explicitly specify them but this is not always possible nor wanted. Physics calculations on complex collider shapes are expensive so sometimes it is preferable to use simple shapes (rectangles, circles) even for entities that have a more complex visualization.
Rapier has a few builder functions for creating colliders, here we used the cuboid() function which creates a cuboid (a rectangle in 2D) shaped collider which is what we need for our platforms. This function takes two arguments: the “half-extents” of our rectangle on the X-axis and the Y-axis. The half-extents are essentially half the width and height of our rectangle as depicted below (along with other colliders that Rapier supports):

We specified 0.5 as the value for the half-extents because our platforms are originally 1x1 pixel rectangles which are then scaled to a larger size. Since Rapier also respects the scale property we need to specify the extents in terms of the original size (1 / 2 = 0.5). Rapier will then apply the scale on the specified size and our collider will end up matching the size of our platform on-screen.
Now if you run the game you will see something interesting.
Our platforms spawn, then immediately start falling due to gravity. Congratulations you just added some physics! Also, if you look closely you will notice that our platforms now have thin borders around them and tiny axes in the center, these are being rendered by the RapierDebugRenderPlugin to show the shape and orientation of the colliders, respectively.
Note how our platforms continue falling through the bottom of the window since we don’t have a “floor” to stop them. Our player will also fall like this so let’s add the floor next. First, add some constants:
const FLOOR_THICKNESS: f32 = 10.0;

const COLOR_FLOOR: Color = Color::rgb(0.45, 0.55, 0.66);
Now add the following to the startup system:
commands
    .spawn(SpriteBundle {
        sprite: Sprite {
            color: COLOR_FLOOR,
            ..Default::default()
        },
        transform: Transform {
            translation: Vec3::new(0.0, WINDOW_BOTTOM_Y + (FLOOR_THICKNESS / 2.0), 0.0),
            scale: Vec3::new(WINDOW_WIDTH, FLOOR_THICKNESS, 1.0),
            ..Default::default()
        },
        ..Default::default()
    })
    .insert(RigidBody::Fixed)
    .insert(Collider::cuboid(0.5, 0.5));
Here we create a floor using the same principles we used previously to spawn the platforms. We have set the body type to Fixed since we don’t want our floor to move. Check the previous post if you are confused by something in the above snippet, especially if you’re wondering why we offset the Y-coordinate from the bottom of the window by half the thickness.
If you run the game now you should see our platforms fall until they hit the floor. Take this moment to appreciate the collider visualizations if you missed them previously.
Code Cleanup
Before we move on to adding physics to our player, let’s clean up some of the platform-related code. Currently, we have a bunch of duplication going on since we are spawning multiple (three) entities with the same group of components. We’ll use bundles to remove this duplication by defining our own PlatformBundle:
#[derive(Bundle)]
struct PlatformBundle {
    sprite_bundle: SpriteBundle,
    body: RigidBody,
    collider: Collider,
}

impl PlatformBundle {
    fn new(x: f32, scale: Vec3) -> Self {
        Self {
            sprite_bundle: SpriteBundle {
                sprite: Sprite {
                    color: COLOR_PLATFORM,
                    ..Default::default()
                },
                transform: Transform {
                    translation: Vec3::new(x, WINDOW_BOTTOM_Y + (scale.y / 2.0), 0.0),
                    scale,
                    ..Default::default()
                },
                ..Default::default()
            },
            body: RigidBody::Fixed,
            collider: Collider::cuboid(0.5, 0.5),
        }
    }
}
Here we create a struct called PlatformBundle to represent the components we expect all our platforms to have. As mentioned in the previous post, bundles allow you to organize groups of components neatly, you don’t have to use them but they make the code more maintainable. The struct must also derive Bundle to be considered a bundle by Bevy. The fields of our bundle are simply the components and bundles we were previously attaching directly inside our startup system.
We’ve also added a new() function to easily create instances of our bundle. This function has the obvious arguments to configure the position and size of the platform and it wraps the previously explicit logic of offsetting the Y-coordinate from the bottom of the window by half the height. We have also changed the body type to Fixed since we don’t actually want our platforms to move.
Now, let’s refactor the setup() system to use this bundle:
fn setup(
    mut commands: Commands,
    mut meshes: ResMut<Assets<Mesh>>,
    mut materials: ResMut<Assets<ColorMaterial>>,
) {
    commands.spawn(PlatformBundle::new(-100.0, Vec3::new(75.0, 200.0, 1.0)));
    commands.spawn(PlatformBundle::new(100.0, Vec3::new(50.0, 350.0, 1.0)));
    commands.spawn(PlatformBundle::new(350.0, Vec3::new(150.0, 250.0, 1.0)));

    commands.spawn(Camera2dBundle::default());

    commands.spawn(MaterialMesh2dBundle {
        mesh: meshes.add(shape::Circle::default().into()).into(),
        material: materials.add(ColorMaterial::from(COLOR_PLAYER)),
        transform: Transform {
            translation: Vec3::new(WINDOW_LEFT_X + 100.0, WINDOW_BOTTOM_Y + 30.0, 0.0),
            scale: Vec3::new(30.0, 30.0, 1.0),
            ..Default::default()
        },
        ..default()
    });

    commands
        .spawn(SpriteBundle {
            sprite: Sprite {
                color: COLOR_FLOOR,
                ..Default::default()
            },
            transform: Transform {
                translation: Vec3::new(0.0, WINDOW_BOTTOM_Y + (FLOOR_THICKNESS / 2.0), 0.0),
                scale: Vec3::new(WINDOW_WIDTH, FLOOR_THICKNESS, 1.0),
                ..Default::default()
            },
            ..Default::default()
        })
        .insert(RigidBody::Fixed)
        .insert(Collider::cuboid(0.5, 0.5));
}
Much cleaner! We used our bundle with the spawn() method as we would with any other bundle. Now if you run the game you should see our platforms (and their colliders) fixed along the bottom of the window. A tiny portion of the platforms is now embedded in the floor, I’ll leave them like this but you should try fixing them as a small exercise.
Moving the Player
In our game we want the user to have complete control over the movement of their character. We don’t necessarily want the character to move as a result of external forces. We just want it to move when the user presses a button on their keyboard. This fits the description of kinematic bodies, which offer complete control over a body’s movement and positioning in defiance of any external forces and contacts, they simply go where they are told to go.
However, there is a downside, this complete control also means that kinematic bodies can “go through” other bodies since they ignore collisions during their movement. We don’t want this. We want the character to collide with the platforms and the floor, to be able to stand on them and move across them. Since kinematic bodies don’t support collisions we could code this collision detection ourselves. This usually involves techniques like ray-casting which are generally complicated to get right.
Since this is such a common part of most games, Rapier provides a built-in component tailor-made to handle input-based movement while considering collisions. This is the KinematicCharacterController component. It allows us to control the movement of a body while taking into account any collisions that may occur. It also has a bunch of other useful features and I recommend reading the Rapier documentation.
Let’s add the necessary components to the player’s ball:
commands
    .spawn(MaterialMesh2dBundle {
        mesh: meshes.add(shape::Circle::default().into()).into(),
        material: materials.add(ColorMaterial::from(COLOR_PLAYER)),
        transform: Transform {
            translation: Vec3::new(WINDOW_LEFT_X + 100.0, WINDOW_BOTTOM_Y + 30.0, 0.0),
            scale: Vec3::new(30.0, 30.0, 1.0),
            ..Default::default()
        },
        ..default()
    })
    .insert(RigidBody::KinematicPositionBased)
    .insert(Collider::ball(0.5))
    .insert(KinematicCharacterController::default());
Here we’ve added a RigidBody component, a Collider component (by specifying the radius of our 1x1 pixel ball, scroll back to the previous section if this doesn’t make sense), and the KinematicCharacterController component.
Now, we are going to enable movement using a new system. We want the player to move in a specified direction with constant velocity so, first, add a constant for the player’s horizontal velocity (pixels/second):
const PLAYER_VELOCITY_X: f32 = 400.0;Then create the following system:
fn movement(
    input: Res<Input<KeyCode>>,
    time: Res<Time>,
    mut query: Query<&mut KinematicCharacterController>,
) {
    let mut player = query.single_mut();

    let mut translation = Vec2::new(0.0, 0.0);

    if input.pressed(KeyCode::Right) {
        translation.x += time.delta_seconds() * PLAYER_VELOCITY_X;
    }

    if input.pressed(KeyCode::Left) {
        translation.x += time.delta_seconds() * PLAYER_VELOCITY_X * -1.0;
    }

    player.translation = Some(translation);
}
and add it to the app:
fn main() {
    App::new()
        .insert_resource(ClearColor(COLOR_BACKGROUND))
        .add_plugins(DefaultPlugins.set(WindowPlugin {
            primary_window: Some(Window {
                title: "Bevy Platformer".to_string(),
                resolution: WindowResolution::new(WINDOW_WIDTH, WINDOW_HEIGHT),
                resizable: true,
                ..Default::default()
            }),
            ..Default::default()
        }))
        .add_plugin(RapierPhysicsPlugin::<NoUserData>::pixels_per_meter(200.0))
        .add_plugin(RapierDebugRenderPlugin::default())
        .add_startup_system(setup)
        .add_system(movement) // new system added
        .run();
}
A bunch of things are happening here that we need to go over:
Systems
First, this is a new system but unlike setup() we did not register it as a startup system. As I mentioned in the previous post, systems perform logic on parts of the game world. By default, Bevy runs registered systems once every frame. When you start your game, Bevy begins running all non-startup systems continuously in a loop. It runs these systems in parallel when possible, especially when they operate on disparate data. One iteration of this “game loop” is a frame and the systems in that iteration are responsible for handling the logic and rendering for that frame. All regular systems are run only once during a single iteration. It is also possible to further control the scheduling of systems, which we will do in future posts.
Resources
The first two arguments of our new system are both resources. Resources are another fundamental part of Bevy and are used to represent “global” data. Things that don’t make sense as entities or as components attached to a specific entity belong as resources. Resources can be used for global configuration, as we did in the last post when we added the ClearColor resource to specify a global color configuration. The default plugin we enabled also added a few useful resources that we can use.
A system can require a resource from Bevy by declaring an argument with the type Res<T>, where T is the type of the resource and if the resource exists, Bevy will provide it at runtime. Res<T> only provides read-only access to the resource, if you need to mutate the resource, use ResMut<T>.
In the above snippet, we are requiring two built-in resources:
Time: Which can be used to get time-related informationInput<KeyCode>: Which can be used to read keyboard inputs
Queries
Query is arguably the most important type that your systems will use and is very powerful. It is used to extract entities and components from the game world by specifying some matching criteria. You can think of the Query type as a way to write an SQL query for your game world. Here we are using it in one of the simplest ways possible but we will see more complicated uses as we build our game further. In the above snippet, we are simply fetching a mutable reference to all KinematicCharacterController components in the game world. Since we know that there will only be one match (the one we added to our player a little earlier) we use the .single_mut() method to get that match from the query instance (use .single() if you want an immutable reference).
Let us now go over the following snippet again:
fn movement(
    input: Res<Input<KeyCode>>,
    time: Res<Time>,
    mut query: Query<&mut KinematicCharacterController>,
) {
    let mut player = query.single_mut();

    let mut translation = Vec2::new(0.0, 0.0);

    if input.pressed(KeyCode::Right) {
        translation.x += time.delta_seconds() * PLAYER_VELOCITY_X;
    }

    if input.pressed(KeyCode::Left) {
        translation.x += time.delta_seconds() * PLAYER_VELOCITY_X * -1.0;
    }

    player.translation = Some(translation);
}
Here we declare a new system which operates on three things:
- A resource that wraps keyboard inputs
- A resource that allows us to read time-related information
- A query for all
KinematicCharacterControllercomponents in our world
We then extract the single instance of the KinematicCharacterController from our query in a mutable fashion. Since this system is responsible for movement, we initialize a 2D vector to represent how many pixels our character should move during this frame. We use 0.0 as the default value along both axes thus assuming no movement by default.
We then use the input resource to check if the user has pressed either the left or right arrow keys and update the movement vector accordingly. Finally, we set the translation property of the KinematicCharacterController, which Rapier will then use to move the character by the amount specified while checking for collisions.
Framerate
The type of calculation we perform to get the actual distance to move is fairly common in game development so let’s take a closer look.
First, imagine a more simplistic way of doing this. We could say that whenever the user presses the right arrow key simply move the character by a fixed distance (say 10 pixels). Our code would look like this:
if input.pressed(KeyCode::Right) {
    translation.x += 10;
}
This is much simpler and would work just fine for our simple game. However, what we have done here is tied our game to the framerate. The framerate is simply a way of expressing how quickly a particular machine can process frames in a game and is expressed using “frames-per-second”.
To understand this term, let’s continue with our example and imagine a player (let’s call him Player A) plays our game on a very slow computer, his computer takes one full second to process all the systems in a single frame of our game (one iteration of the game loop). This means our movement() system would be invoked once every second. If the player has the right arrow key held down, their character would move 10 pixels every time the system is run, thus it would move 10 pixels every second. Let’s imagine this distance is appropriate for the intricate movement required by our hypothetical game.
Now imagine a second player (Player B) playing our game on a slightly more powerful machine that is capable of processing all the systems for a frame in 500 milliseconds (500 ms). Since our system now runs once every 500ms, it would be run twice in a second. Thus, this player’s character would move 20 pixels for every second the right arrow key is held down. This is faster than Player A’s character but not a big deal.
This is when Player C comes along with a high-end computer that is capable of processing all systems in 1 ms. This player’s character would move 10000 pixels in a second (10 pixels * 1000 (milliseconds in a second) = 10000). The character would careen off to the right side of the screen every time the player pressed the right arrow key. The game would now be unplayable. The image below depicts this:
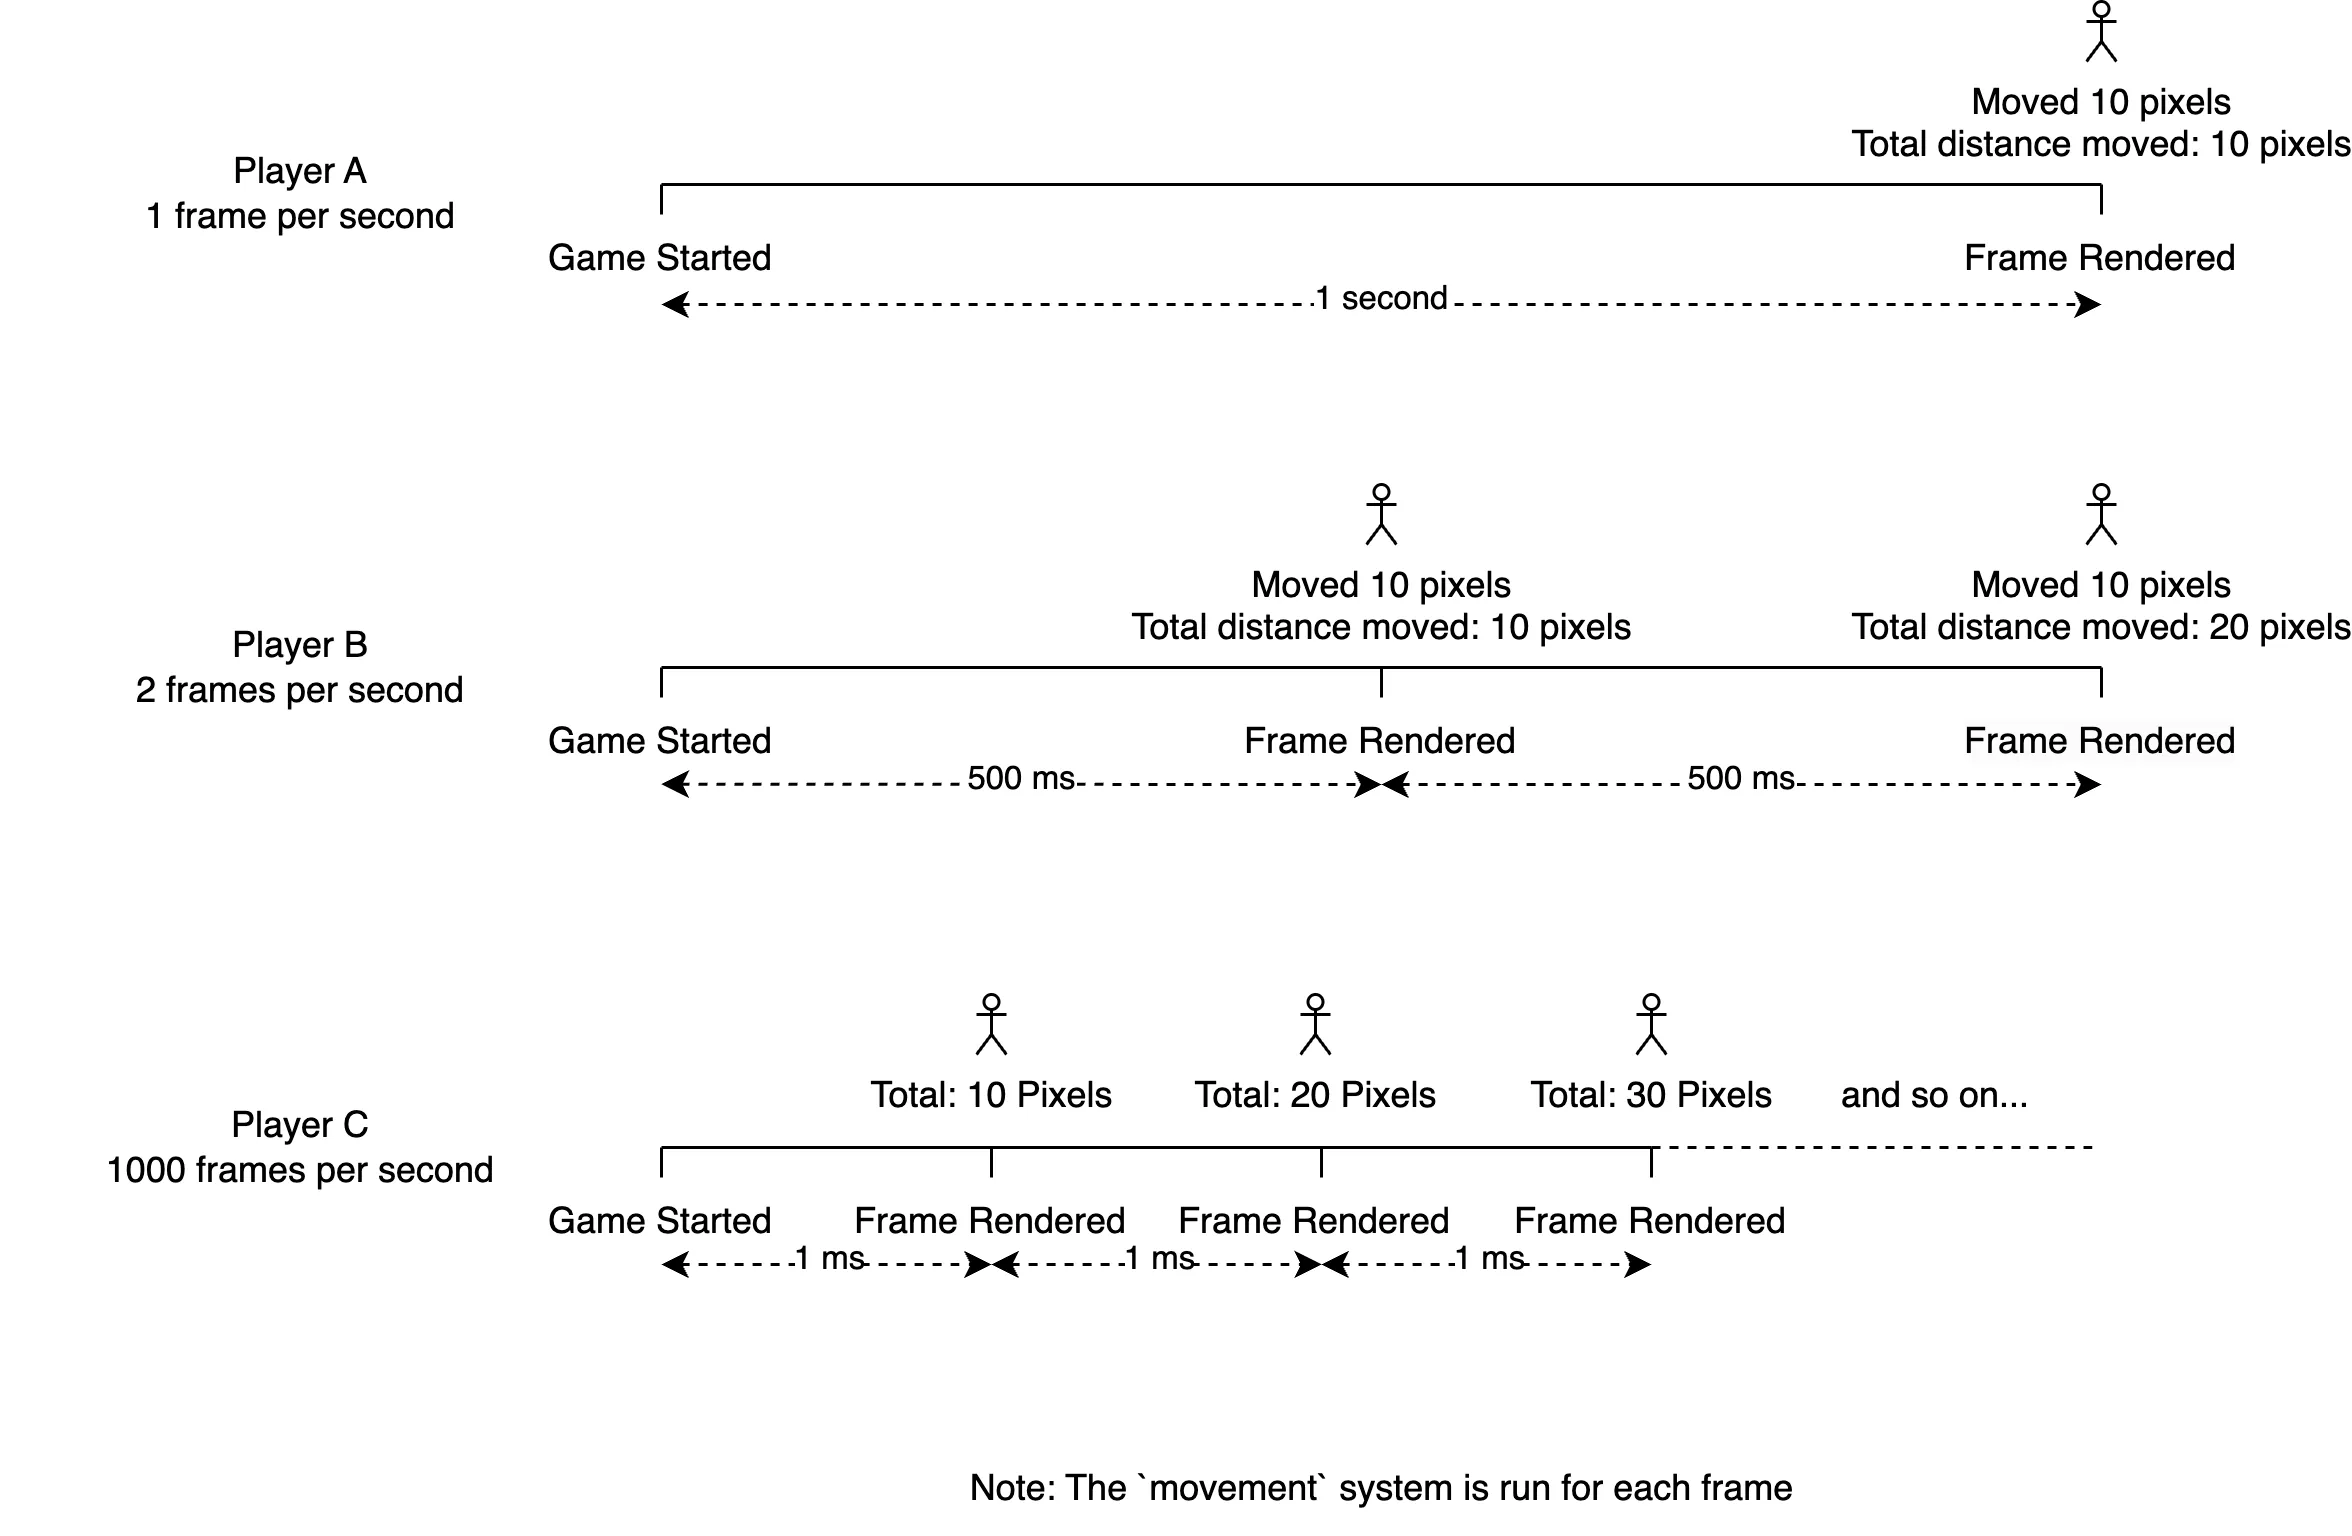
This is what we mean by “tying our game to the framerate”: the mechanical aspects of our game (our character’s speed) vary based on the hardware it is being played on. This is why a lot of older games are mostly unplayable on modern hardware since some part of their logic is similarly tied to the framerate. I noticed this issue when I played Cossacks: European Wars a couple of years ago. It is a strategy game set in the 18th century where your units will turbo-jet to the other side of the map if you play it on modern hardware (you can fix this using some settings).
Now that we understand why this is a problem let’s talk about the solution. Instead of tying our movement to the framerate, which will vary from player to player, let’s tie it to something every player will experience in the same way: time. One second in the real world for Player A is the same as one second for Player C, so we would want them to experience the same movement for every real-world second. In doing this we also get to reuse the plethora of concepts already present in the domain of understanding movement per unit of time. Velocity is one such concept and is defined as distance per second, just what we need.
If we define a constant velocity (const PLAYER_VELOCITY_X: f32 = 400.0) we can move the character consistently every time our system is run by multiplying it by the time elapsed since the last frame (time.delta_seconds()). Now our character will move at the same speed relative to real-world time regardless of how powerful the machine running our game is.
It is also important to understand that framerates aren’t nessecarily consistent even for a given machine and may dip and rise based on what is happening in the game at that moment and due to other loads on the machine. This is even more reason not to tie your game to the framerate.
Now if you run the game you should be able to move the ball horizontally and see it colliding with the platforms!
Notice, however, that the ball is still slightly floating in mid-air. Why?
Jumping and Gravity
If you paid attention when we talked about rigid bodies you might remember that kinematic bodies (which our player is) are not affected by external forces, like gravity, this is why our ball is still floating. Let’s now give the character the ability to jump and fall.
First, add constants for the vertical velocity and the maximum jump height:
const PLAYER_VELOCITY_Y: f32 = 850.0;

const MAX_JUMP_HEIGHT: f32 = 230.0;
Since a full jump may span across multiple frames, and thus multiple invocations of our system, we need to keep track of how far along its jump the ball is, so we can compare it to the maximum jump height and begin the fall when necessary. This sounds like “state” and we will define our own component to store it:
#[derive(Component)]
struct Jump(f32);
We will attach this component to our character when the user presses the jump key, update the wrapped value as the character progresses through its jump, and remove the component when the character hits the max jump height so that it can fall.
Add a system that initializes the jump when the user presses the up arrow key:
fn jump(
    input: Res<Input<KeyCode>>,
    mut commands: Commands,
    query: Query<Entity, (With<KinematicCharacterController>, Without<Jump>)>,
) {
    if query.is_empty() {
        return;
    }

    let player = query.single();

    if input.pressed(KeyCode::Up) {
        commands.entity(player).insert(Jump(0.0));
    }
}
Here we are querying for all entities that have the KinematicCharacterController component but not the Jump component. The second type argument for the Query type can be used to provide matching criteria that we don’t need access to but should still be applied when querying the game world. In the above snippet, we don’t actually use the KinematicCharacterController component or the Jump component in the system but only want the system to run for entities that have the KinematicCharacterController component (i.e our character) but not the Jump component (to prevent jumping again while already in the middle of a jump), so we used a tuple type for the second type parameter in combination with the With and Without types.
This query will not match anything if the character is in the middle of a jump (has Jump, thus fails to match Without<Jump>), so we perform an early return if the query result is empty.
Also, note that the thing we are querying for is the entity itself so that we can attach the Jump component to it (using Commands) with a starting value of 0.0.
Next, create a system that moves the character upwards if they have the Jump component but have not reached the maximum jump height:
fn rise(
    mut commands: Commands,
    time: Res<Time>,
    mut query: Query<(Entity, &mut KinematicCharacterController, &mut Jump)>,
) {
    if query.is_empty() {
        return;
    }

    let (entity, mut player, mut jump) = query.single_mut();

    let mut movement = time.delta().as_secs_f32() * PLAYER_VELOCITY_Y;

    if movement + jump.0 >= MAX_JUMP_HEIGHT {
        movement = MAX_JUMP_HEIGHT - jump.0;
        commands.entity(entity).remove::<Jump>();
    }

    jump.0 += movement;

    match player.translation {
        Some(vec) => player.translation = Some(Vec2::new(vec.x, movement)),
        None => player.translation = Some(Vec2::new(0.0, movement)),
    }
}
Here we use a tuple for the first type argument to Query in order to extract multiple things from the game world, while also specifying the criteria to be matched: the entity itself, a mutable reference to KinematicCharacterController, and a mutable reference to the Jump component.
This system uses the same time-based movement logic that was described earlier to calculate how far the character should move vertically during this frame. It adds this distance to the Jump component’s wrapped value to keep track of how far the character has jumped so far. If the total distance jumped exceeds the maximum jump height, we clamp the value and remove the Jump component, indicating that the jump is now complete.
Finally, since we have two systems (movement and rise) accessing the translation vector on KinematicCharacterController in a single frame, we need to first check if the vector has already been set and only modify the Y-component if so. If it is not set, we simply create a new vector with a zero X-component.
We also need to update the movement() system to handle the translation vector in the same way:
fn movement(
    input: Res<Input<KeyCode>>,
    time: Res<Time>,
    mut query: Query<&mut KinematicCharacterController>,
) {
    let mut player = query.single_mut();

    let mut movement = 0.0;

    if input.pressed(KeyCode::Right) {
        movement += time.delta_seconds() * PLAYER_VELOCITY_X;
    }

    if input.pressed(KeyCode::Left) {
        movement += time.delta_seconds() * PLAYER_VELOCITY_X * -1.0;
    }

    match player.translation {
        Some(vec) => player.translation = Some(Vec2::new(movement, vec.y)), // update if it already exists
        None => player.translation = Some(Vec2::new(movement, 0.0)),
    }
}
Add both jump() and rise() to the app using add_system() and run the game. Now, if you press the up arrow key you should see the ball rise to its maximum jump height. Great! Now let’s finish our jump by adding a fall mechanism.
The falling logic is simple: simply get the character if it is not in the middle of a jump (i.e. does not have the Jump component attached) and apply a downward velocity to it:
fn fall(time: Res<Time>, mut query: Query<&mut KinematicCharacterController, Without<Jump>>) {
    if query.is_empty() {
        return;
    }

    let mut player = query.single_mut();

    // I am using two-thirds of the Y-velocity since I want the character to fall slower than it rises
    let movement = time.delta().as_secs_f32() * (PLAYER_VELOCITY_Y / 1.5) * -1.0;

    match player.translation {
        Some(vec) => player.translation = Some(Vec2::new(vec.x, movement)),
        None => player.translation = Some(Vec2::new(0.0, movement)),
    }
}
Add this system to the game and run it. The character should now fall after it completes its jump!
However, there is a bug: even though we can’t “double-jump” during the rise, we can “double-jump” during the fall. Try this now by pressing the up arrow key while falling. This is because the jump() system only requires that the character not have the Jump component attached, which gets removed during the fall, it should also ensure that the character is grounded before allowing the jump.
This is where an important counterpart of the KinematicCharacterController comes in: the KinematicCharacterControllerOutput component. This is another Rapier component, which automatically gets attached to all entities with the KinematicCharacterController component. This component allows you to get some useful information about the character, one such piece of information is whether or not the character is grounded. Let’s update the jump() system to use this component:
fn jump(
    input: Res<Input<KeyCode>>,
    mut commands: Commands,
    query: Query<
        (Entity, &KinematicCharacterControllerOutput),
        (With<KinematicCharacterController>, Without<Jump>),
    >,
) {
    if query.is_empty() {
        return;
    }

    let (player, output) = query.single();

    if input.pressed(KeyCode::Up) && output.grounded {
        commands.entity(player).insert(Jump(0.0));
    }
}
Here we simply update our query to get the KinematicCharacterControllerOutput as well, then use its grounded property in our jump check. Run the game and you will see that the “falling-jump” bug is now gone:
It is important to understand that movement is an intimate part of most games and how a character moves in a game contributes to what makes that game unique and enjoyable. Perfecting a character’s movement involves tinkering with the various parameters that control motion, in our case these are the velocities and the maximum jump height we defined earlier. Feel free to play around with these values until the character moves in a way that you are satisfied with.
We have now completed the core functionality of our game: we have a player character, we have platforms, and we can jump between those platforms. Great job! Next time we will give our game a visual overhaul by adding sprites and animations, see you then.
All the code for this part is available on Github.