
Introduction
I recently decided to learn game development. I’ve been programming for a while now but I have no prior experience in game development. I’ve always been interested in building games, but have found certain aspects of the field daunting. Specifically, the perceived complexity of the math involved and the level of optimization required to create non-trivial games. However, having recently picked up Rust and wanting to build something I decided to jump into game development.
This is going to be the first in a series of posts where I’ll be building a simple game as an intro to game dev. These posts are aimed at other budding rustaceans who might be interested in game dev but know close to nothing about the subject like me. I will try to provide detailed (perhaps too detailed) explanations for common game dev concepts and terminology.
The Game
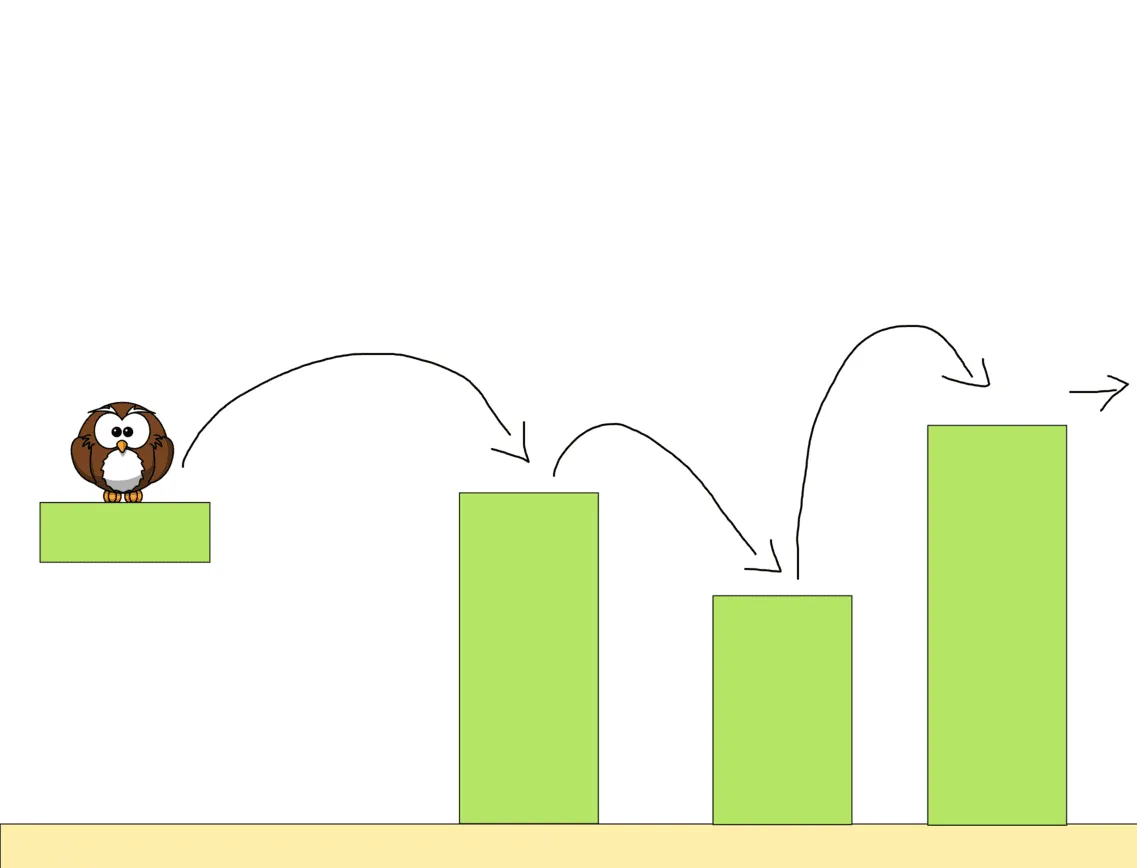
We will be building a very simple 2D platformer/side-scroller. The objective will be for the player to move across the level jumping from platform to platform. The level will be infinite and we will “procedurally” generate more platforms as the player moves to the right. If the player falls to the floor, it’s game over. The player’s score will be based on how far they have progressed.
This is probably the simplest game you can build but I think it’s a good place to start as a beginner.
The Stack
As mentioned above we will be building this in Rust so some prior Rust knowledge is required but you don’t have to be a Rust expert to follow along since the game engine we’ll be using has a very developer-friendly API which doesn’t rely on “complex” Rust features.
We will be using Bevy to build our game. Bevy is one of the more popular Rust game engines and is really fun to use. Though, it probably isn’t the right choice (yet) if you want to get “serious” about game development when compared to engines like Unity, Unreal, and Godot.
These engines have been around for a long time and have large communities and rich ecosystems along with really powerful GUI-based tools that help you in building large games. I have never used any of these engines before but I am assuming the game we are building can probably be built very quickly through their GUI-based tools by just dragging and dropping things on the screen without having to write a single line of code (probably).
However my goal is not to build a game, it is to learn game development so I’d like to understand some of the implementation details these tools usually abstract away.
ECS
Bevy is a data-oriented game engine based on the ECS paradigm. ECS (Entity Component System) is a design paradigm that splits your game into three parts:
- Entities: These are all the things that exist in your game world. These are not just your playable characters or enemies but everything including buildings, the floor, the background, and even the camera is an entity in ECS. You can think of them like the structs or classes you would normally create when developing something.
- Components: Components, simply put, are attributes that are attached to an entity. Things like a character’s health, and their position on the screen are all defined using components. You can think of them like the fields you would put inside the struct for your entity. If you are familiar with inheritance you may be inclined to think that there can be different types of entities (i.e. enemy entities or NPC entities) however this is not the case, entities are only of one type and they are differentiated based on the components they possess.
- Systems: This is where all of the game logic will live and it is the place where you will spend most of your time. Systems execute game logic on groups of entities and their components.
In Bevy entities are represented just by their numeric identifier and we are usually more interested in their components which are created using structs and enums. Systems, in Bevy, are defined using functions.
All of this should become more clear as we develop our game.
Setup
Enough words, time to code. First, we will need to set up our development environment. You will need a fairly recent version of Rust installed to follow along (just run rustup update), I am using 1.69.0 for reference.
Let’s start by creating a Rust binary package and installing Bevy as a dependency:
cargo new bevy_platformer
cd bevy_platformer/
cargo add bevy
A note on performance
As we develop our game and add features we will be running it (in dev mode) to test things out, dev builds in Rust are unoptimized to allow for quicker build times, this is usually okay when developing other types of systems but the lack of optimizations may cause choppiness and lag in games. To prevent this we will configure some optimizations for our dev builds.
We will enable level 1 optimizations for our own code and level 3 optimizations for all our dependencies. Add the following to your Cargo.toml:
[profile.dev]
opt-level = 1

[profile.dev.package."*"]
opt-level = 3
These optimizations come at the cost of build time so we will also need to add some configurations to speed up compilations. The full list of configurations is described in the official Bevy documentation but I will only use a subset of these. Feel free to use more of the suggestions if your builds are slow.
Update Cargo.toml to enable Bevy’s dynamic linking feature:
[dependencies]
bevy = { version = "0.10.1", features = ["dynamic_linking"] }
With these settings, I am able to get near-instantaneous builds that don’t suffer from lag or choppiness. I am running this on a M2 MacBook Pro 2023 and your mileage may vary; you should enable more fast compilation configurations if you encounter slow builds.
Getting Started
Let’s start by creating our game app and adding a simple system:
use bevy::prelude::*;

fn main() {
    App::new()
        .add_plugins(DefaultPlugins)
        .add_startup_system(setup)
        .run();
}

fn setup() {
    println!("Hello, World!")
}
Here we’ve initialized a Bevy App and added two things to it:
- Default plugins: This is a set of built-in plugins that add a bunch of features that every game needs. This includes: setting up a game window, and a bunch of systems that help with rendering and other things.
- A startup system: A startup system is just like a regular system except that it runs once at the start of the game. This is useful for laying the foundations for your game world. Here we created a simple function called
setupthat just prints to the screen, then we added it to the app using.add_startup_system(setup).
Now if you run this using cargo run you should see an empty game window (since we haven’t rendered anything yet) pop up and “Hello, World!” printed to your console among other logs.
Note the first build may take a while since we are building an entire game engine! however, subsequent builds should be much faster.
Rendering Platforms
Eventually, we want our game to look like an actual game with nice-looking sprites; however, for now, we’ll just use mono-colored shapes to represent entities. Let’s start by using our setup function to spawn a platform as a rectangle.
fn setup(mut commands: Commands) {
    commands.spawn(SpriteBundle {
        sprite: Sprite {
            color: Color::LIME_GREEN,
            ..Default::default()
        },
        transform: Transform {
            translation: Vec3::new(0.0, 0.0, 0.0),
            scale: Vec3::new(50.0, 100.0, 1.0),
            ..Default::default()
        },
        ..Default::default()
    });
}
There are a couple of things going on here so let’s go over them one by one.
First, notice that our system now accepts an argument. Systems, in Bevy, can have arguments and these arguments form the basis of how systems interact with the game world. The arguments must be of types that Bevy understands (otherwise we will get compilation errors) and when Bevy runs these systems it will provide the appropriate parameters, sort of like dependency injection. Here we are only accepting a single argument but you can write systems that require multiple arguments (up to a limit) and Bevy will fill in their values at runtime. These arguments are also how a system “queries” the game world for the list of entities and components that it wants to operate on.
Here we require an argument of type Commands which is a type that allows us to queue changes to the game world, like spawning entities.
Next, we use the spawn() method to spawn an entity. You might think we are spawning an entity of type SpriteBundle but that is incorrect, as mentioned in the previous section: entities are all of the same type (Entity) which is just a wrapper around their numeric identifier, and they are differentiated based on their components. What we are actually doing here is spawning an entity (which is essentially transparent to us) by attaching to it the components that are inside SpriteBundle.
To understand this further, consider the following:
commands.spawn(Transform::from_xyz(0.0, 0.0, 0.0));Transform is a component and in the above snippet, we are spawning an entity that has a Transform component attached. We can also attach multiple components to an entity using a tuple like so:
commands.spawn((
    Transform::from_xyz(0.0, 0.0, 0.0),
    Sprite {
        color: Color::LIME_GREEN,
        ..Default::default()
    },
));
Now we are spawning an entity with two components attached, one of type Transform and the other of type Sprite. You can attach as many components as you want to an entity but using tuples gets unwieldy which is why Bevy has the concept of a “bundle” which allows organizing groups of components more ergonomically.
The bundle in question here is the SpriteBundle which is a group of components related to rendering sprites. The only components of interest here are the Sprite and Transform components (for everything else we use the default values). The Sprite component allows us to render some texture to the screen, for now, we are only using it to render a color (lime green) and setting everything else to default.
To understand the Transform component we must first understand Bevy’s coordinate system. Bevy has a three-dimensional Cartesian coordinate system, which has the following properties:
- For 2D, the origin (X=0.0; Y=0.0) is at the center of the screen by default.
- The X-axis goes from left to right (+X points right).
- The Y-axis goes from bottom to top (+Y points up).
- The Z-axis goes from far to near (+Z points towards you, out of the screen).
It is a “right-handed” system if you were to lay the back of your hand across the screen as depicted below.

Bevy uses the three-dimensional system even for 2D games, in the 2D world you can think of the Z-coordinate in terms of layers or as a stack of sheets where the Z-coordinate describes the order of the sheets in the stack.
The Transform component allows us to position and scale our entity in this coordinate system. The Transform.translation property is of type Vec3 which is just a vector of three elements representing the coordinates (x, y, z) for where the entity should be rendered. The Transform.scale is also of type Vec3 and allows us to scale our entity to change its size. By default, the sprite is rendered as a 1x1x1 pixel box; using the scale property, we can scale it (by multiplication) along any axis.
Armed with this knowledge we can now understand this snippet:
commands.spawn(SpriteBundle {
    sprite: Sprite {
        color: Color::LIME_GREEN,
        ..Default::default()
    },
    transform: Transform {
        translation: Vec3::new(0.0, 0.0, 0.0),
        scale: Vec3::new(50.0, 100.0, 1.0),
        ..Default::default()
    },
    ..Default::default()
});
This piece of code spawns an entity with multiple attached components. The Sprite component is used to create a 1x1x1 pixel rectangle (technically it’s a cube, however since we are rendering in 2D I will call it a rectangle) and set its color to lime green. The Transform component is used to render the shape at the origin point (0, 0, 0 - which is the center of the screen) and scale its size as follows:
- By 50 along the X-axis (i.e.
50 * 1 pixel = 50 pixels) - By 100 along the Y-axis (i.e.
100 * 1 pixel = 100 pixels) - By 1 along the Z-axis (i.e.
1 * 1 pixel = 1 pixel)
Now, if you run cargo run you will see… nothing, this is because we haven’t added a camera to our app to view the rendered entities. Let’s do that now:
fn setup(mut commands: Commands) {
    commands.spawn(SpriteBundle {
        sprite: Sprite {
            color: Color::LIME_GREEN,
            ..Default::default()
        },
        transform: Transform {
            translation: Vec3::new(0.0, 0.0, 0.0),
            scale: Vec3::new(50.0, 100.0, 1.0),
            ..Default::default()
        },
        ..Default::default()
    });

    commands.spawn(Camera2dBundle::default());
}
The last line instructs Bevy to spawn an entity with components from a built-in camera bundle (Camera2dBundle), we use the defaults here which spawns a 2D camera with orthographic projection (as opposed to perspective projection), more on this below.
Now if your run the game you should see the following:

This isn’t much to show but we have covered some important fundamentals which will be useful in the future. Before we move on, note one thing: the rectangle is centered on the screen (remember we set the coordinates to 0, 0, 0), this means the anchor point in Bevy’s transform system is at the center, by default. Bevy centers our entities at the point whose coordinates we provide then renders half the width on the left and right sides of that point and half the height above and below that point:
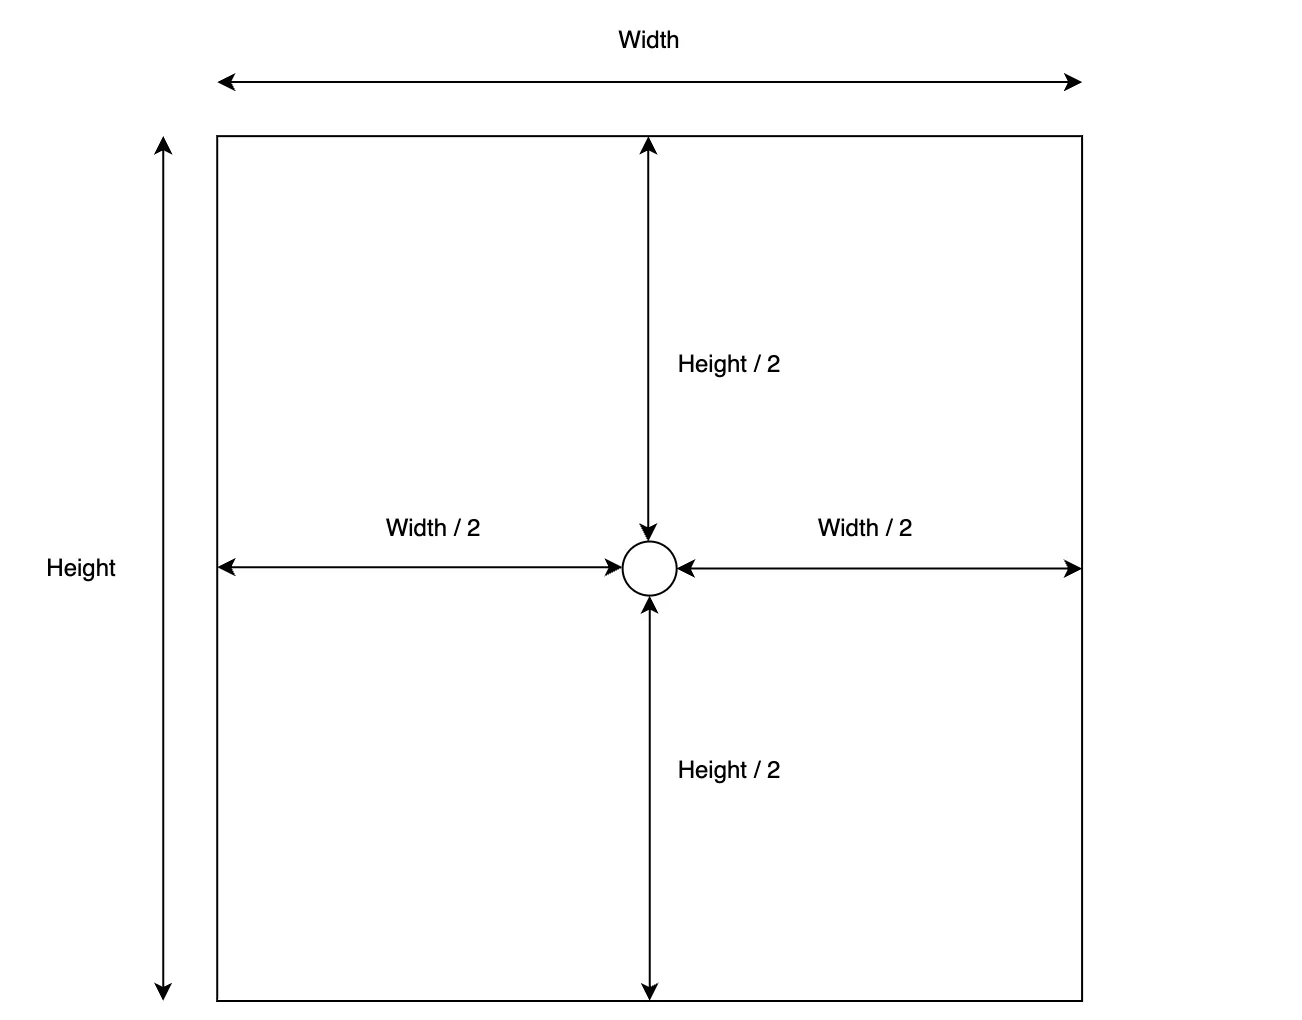
Anchor points vary from engine to engine so this is important to remember. Now let’s talk about projections.
Projections
As we create our game world and spawn entities, what the player sees on their screen depends on our camera and what projection it uses. A projection is simply a way of mapping a 3D space (the game world) onto a 2D plane (the user’s screen). There are various projections but two common categories are:
- Perspective projections
- Orthographic projections
Perspective projection is similar to what the human eye does where the depth (distance from the eye) of an object contributes to how big or small it seems.
Orthographic projection, on the other hand, ignores depth completely. You can think of it as if your eye was a screen and all “rays of light” from objects (projection lines) travel in parallel to each other (and orthogonal to you) to reach your “screen-eye” and thus everything appears to be its original size regardless of how far it is from your “screen-eye”.
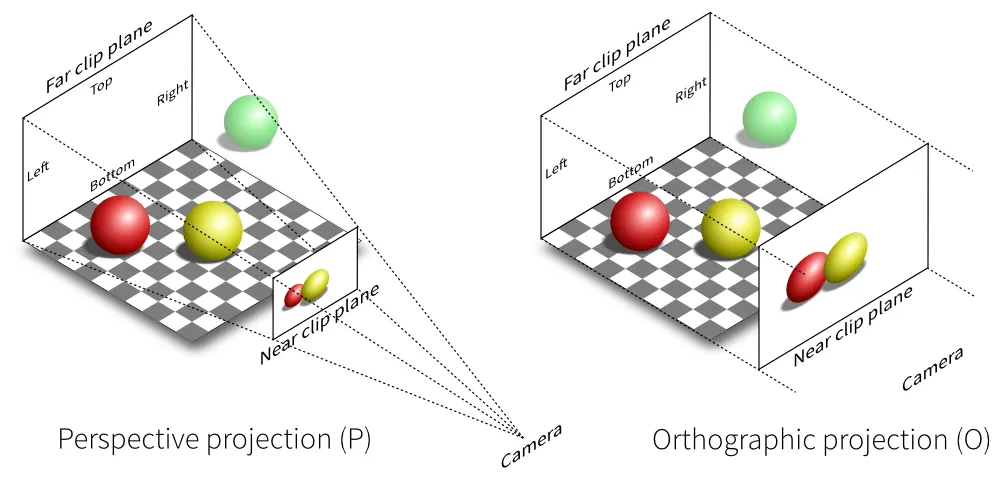
Since we are building a 2D side-scroller we want to ignore depth, so orthographic projection is exactly what we need and the camera bundle we just initialized provides this by default. Bevy also supports perspective projection which you can configure when using the 3D camera bundle (documentation).
Positioning Platforms
Next, we want to spawn a bunch of platforms and position them on the “floor”, first however, we need to define where the floor actually is. Obviously, it should be along the bottom of our game window. To keep things simple we’re also going to fix the window’s size. Let’s define some constants to represent this:
const WINDOW_WIDTH: f32 = 1024.0;
const WINDOW_HEIGHT: f32 = 720.0;

const WINDOW_BOTTOM_Y: f32 = WINDOW_HEIGHT / -2.0;
const WINDOW_LEFT_X: f32 = WINDOW_WIDTH / -2.0;
Remember, in Bevy’s coordinate system the origin is at the center of the screen so if we traverse half the height of the window downwards (negative Y) we would reach the bottom of the window. The same logic can also be used to obtain the leftmost point of the window.
Now let’s fix the window’s size using these constants:
fn main() {
    App::new()
        .add_plugins(DefaultPlugins.set(WindowPlugin {
            primary_window: Some(Window {
                title: "Bevy Platformer".to_string(),
                resolution: WindowResolution::new(WINDOW_WIDTH, WINDOW_HEIGHT),
                resizable: false,
                ..Default::default()
            }),
            ..Default::default()
        }))
        .add_startup_system(setup)
        .run();
}
Here we configure the WindowPlugin that was automatically added as part of the default plugins to fix the window’s size, prevent the user from resizing it, and set a custom title.
Next, let’s change our startup system to spawn three platforms of different sizes at different horizontal positions along the bottom of the screen:
fn setup(mut commands: Commands) {
    commands.spawn(SpriteBundle {
        sprite: Sprite {
            color: Color::LIME_GREEN,
            ..Default::default()
        },
        transform: Transform {
            translation: Vec3::new(-100.0, WINDOW_BOTTOM_Y + (200.0 / 2.0), 0.0),
            scale: Vec3::new(75.0, 200.0, 1.0),
            ..Default::default()
        },
        ..Default::default()
    });

    commands.spawn(SpriteBundle {
        sprite: Sprite {
            color: Color::LIME_GREEN,
            ..Default::default()
        },
        transform: Transform {
            translation: Vec3::new(100.0, WINDOW_BOTTOM_Y + (350.0 / 2.0), 0.0),
            scale: Vec3::new(50.0, 350.0, 1.0),
            ..Default::default()
        },
        ..Default::default()
    });

    commands.spawn(SpriteBundle {
        sprite: Sprite {
            color: Color::LIME_GREEN,
            ..Default::default()
        },
        transform: Transform {
            translation: Vec3::new(350.0, WINDOW_BOTTOM_Y + (250.0 / 2.0), 0.0),
            scale: Vec3::new(150.0, 250.0, 1.0),
            ..Default::default()
        },
        ..Default::default()
    });

    commands.spawn(Camera2dBundle::default());
}
Take note of how we have positioned each platform by offsetting its Y-coordinate by half of its height from the bottom of the window. This is because the anchor point is at the center. If we simply set the Y-coordinate to be at the bottom of the window, half of the platform would be below the screen.
We have some code duplication now but we will clean that up in the future. Now when you run the game you should see the following:

Even though we will eventually be rendering actual sprites let’s make things slightly more pleasing to look at until we get there. Start by defining the following constants for the colors we will be using:
const COLOR_BACKGROUND: Color = Color::rgb(0.29, 0.31, 0.41);
const COLOR_PLATFORM: Color = Color::rgb(0.13, 0.13, 0.23);
const COLOR_PLAYER: Color = Color::rgb(0.60, 0.55, 0.60);
Here we just define three colors using their RGB components (from 0-1 instead of 0-255). Next, change the color for each of our platforms by changing the configuration of the Sprite component:
commands.spawn(SpriteBundle {
    sprite: Sprite {
        color: COLOR_PLATFORM, // color changed
        ..Default::default()
    },
    transform: Transform {
        translation: Vec3::new(-100.0, WINDOW_BOTTOM_Y + (200.0 / 2.0), 0.0),
        scale: Vec3::new(75.0, 200.0, 1.0),
        ..Default::default()
    },
    ..Default::default()
});
Now edit the app configuration to change the background color of the window:
fn main() {
    App::new()
        .insert_resource(ClearColor(COLOR_BACKGROUND)) // resource added
        .add_plugins(DefaultPlugins.set(WindowPlugin {
            primary_window: Some(Window {
                title: "Bevy Platformer".to_string(),
                resolution: WindowResolution::new(WINDOW_WIDTH, WINDOW_HEIGHT),
                resizable: false,
                ..Default::default()
            }),
            ..Default::default()
        }))
        .add_startup_system(setup)
        .run();
}
Here we insert a resource into the app to achieve this. Resources are an important Bevy concept that I will cover in future posts, for now, you can just add the line knowing that it just changes the background color. Now if you run the app you should see our new colors in action.
Finally, let’s spawn a ball to represent our player. Change your setup() system like so:
fn setup(
    mut commands: Commands,
    mut meshes: ResMut<Assets<Mesh>>,
    mut materials: ResMut<Assets<ColorMaterial>>,
) {
    // code for platforms and camera hidden for brevity

    commands.spawn(MaterialMesh2dBundle {
        mesh: meshes.add(shape::Circle::default().into()).into(),
        material: materials.add(ColorMaterial::from(COLOR_PLAYER)),
        transform: Transform {
            translation: Vec3::new(WINDOW_LEFT_X + 100.0, WINDOW_BOTTOM_Y + 30.0, 0.0),
            scale: Vec3::new(30.0, 30.0, 1.0),
            ..Default::default()
        },
        ..default()
    });
}
Our system signature has changed slightly, we are now accepting two more arguments which are different types of resources, and using those to render a ball to the screen by spawning an entity with components from MaterialMesh2dBundle (the Transform component you should be familiar with now, I’ve chosen an arbitrary starting location for the ball near the left side of the screen). The two resources have to do with how a mesh (the ball) is rendered to the screen and how a material (the color) is applied to it. I will not go into the details of meshes and materials for two reasons:
- I don’t understand them that well myself
- We are only rendering the ball until we add sprites so it is essentially a placeholder
Resources, however, are very relevant and will be covered in future posts. Now if you run the game you should see the following:

Great work! I think this is a good place to stop for now. Our ball is sort of hanging in mid-air a bit but we will rectify that in the next post when we add physics to our game. See you then.
All the code for this part is available on Github.